Craft Charming & Budget-Friendly Christmas Decor in a Single Afternoon!
Ah, Christmas! That magical time fills our hearts with warmth, laughter, and, of course, the desire to make our homes look beautiful. But let’s be honest, who doesn’t feel a little overwhelmed by the budget and time it takes to transform our living space into that winter wonderland? Buying new ornaments every year can hit your wallet hard, and the idea of decorating your entire home from top to bottom… phew, sounds like a marathon. What if you could achieve a festive and charming decoration without breaking the bank and, best of all, in a single afternoon?
Well, get ready, because this is your friendly guide to unleash your inner creativity and fill your home with Christmas spirit. This post proposes DIY projects that are not only a steal and super fast but will also leave your heart warm with satisfaction! You’ll dive into the magic of handmade items, using those little things you already have around the house or can get for next to nothing. Any ordinary afternoon is about to become your most fun and productive crafting session. And in the end, you’ll not only have a home that’s a joy to behold, but the pleasure of saying: “I made this myself!” Giving your celebrations that unique and very personal touch.
Decorating for the holidays doesn’t have to be a burden on your wallet or a headache for your schedule. In fact, the most beautiful decorations, the ones that truly have soul, are usually those made with ingenuity and a lot of love, rather than money. The sentimental value of an ornament made with your own hands… that’s priceless! It far surpasses anything you can buy in a store.
And the key here is the “one afternoon” approach. These are projects that don’t require you to be an expert or have unusual tools. They are things you can finish in just a few hours. This speed isn’t just great if you’re always short on time; it gives you instant gratification. Seeing your creations decorating your home almost immediately… it’s amazing!
The advantages of taking the plunge are many:
- Significant Savings! Say goodbye to exaggerated decoration expenses.
- Uniquely Yours: Your home will reflect your style, creating an atmosphere that is 100% you.
- Creativity and Fun: It’s the perfect time to disconnect from stress, put on your favorite music, and thoroughly enjoy creating.
- Planet-Friendly: Embrace reusing and recycling. Less consumption, less impact!
- Making Memories: Crafting these DIY decorations with family can become a cherished tradition.
So, get ready to take everyday items and natural treasures and transform them into pieces brimming with charm and originality. All without going over budget and, most importantly, enjoying every step!

Foundational Principles for a Quick and Economical Crafting Afternoon
Before diving into the projects, let’s lay the groundwork to ensure your crafting afternoon is a resounding success and stress-free. The key to making everything flow smoothly and be fun is good initial planning.
Inventory of Existing Materials: Your Hidden Treasure at Home
Before you even think about shopping, go on a “treasure hunt” in your own home. You’ll be surprised how many things you have that you can recycle, reuse, or transform into festive decorations!
- Old boxes: Perfect for cutting stencils, or wrap and stack them as decorative gifts.
- Glass jars and bottles: Jam jars and wine bottles are ideal for candle holders, impromptu vases, or charming containers.
- Fabric scraps: Pieces of cotton, felt, jute, or even old clothes can become bows, embellishments, or fillings.
- Leftover wrapping paper, paper bags, old newspapers or magazines: Ideal for garlands, paper ornaments, or original gift wraps.
- Elements from nature: Take a stroll through your garden or a park. Pinecones, pine or fir branches, dried leaves, acorns, bare branches, or red berries are free treasures that will add an authentic touch to your decor!
- Half-used candles: Don’t throw them away. They look great in decorated jars or as part of a centerpiece.
- String, thread, yarn: Always useful for hanging, tying, and crafting.
Key Economical Materials That Make a Difference (If You Need to Buy Something)
If you really need to buy something, look for versatile items that won’t cost an arm and a leg. These are your best friends for decor that won’t strain your wallet:
- Paper and cardstock: In festive colors (red, green, white, gold) or neutrals for painting.
- String, jute twine, or rough string: Great for hanging, tying, and adding a trendy rustic touch.
- Glue: White school glue, glue stick, and, very important for speed, a hot glue gun with its glue sticks.
- Scissors and utility knife: Basic tools for any project.
- Spray paint: White, silver, or gold for a magical touch on pinecones, branches, or old ornaments!
- Glitter: For that special sparkle.
- Felt: Super cheap, easy to cut, and doesn’t fray. Ideal for ornaments and appliqués!
- Epsom salts or baking soda: For creating fake snow.
Basic Tools Always at Hand
Make sure you have your basic toolkit ready. It will make your life easier for every project!
- Good cutting scissors.
- Utility knife and a cutting mat (or something to protect your table).
- Ruler and pencil.
- Hot glue gun (essential for quick assembly!).
- Paint brushes (if painting).
- Needle and thread (for garlands or simple sewing details).
The ‘One Afternoon’ Approach: Choose Your Projects Wisely!
To truly get it done “in a single afternoon,” choose projects that meet these criteria:
- No long drying times: Hot glue is your salvation. If you paint, look for quick-drying paint or use a hairdryer!
- Simple instructions: Avoid complicated techniques.
- Batch processing: It’s better to make many small ornaments than a single large, elaborate piece.
- Family-friendly: If everyone lends a hand, it’s not only faster, but much more fun!
With these tricks up your sleeve, you’re more than ready to dive into an afternoon of pure festive creation!
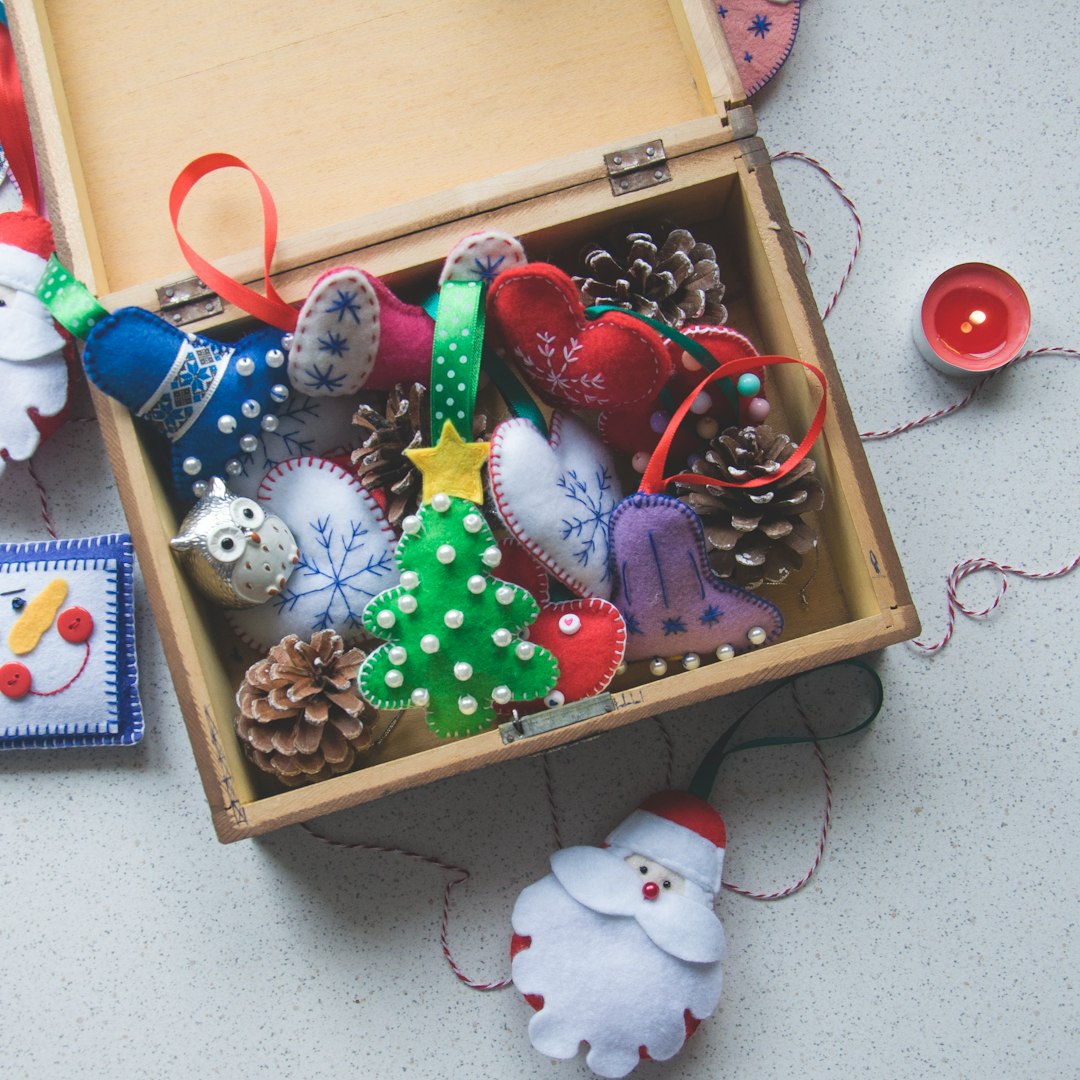
Tree Ornaments Made in Minutes
Homemade ornaments give your tree a rustic touch and a story to tell. They are so easy to make that they are perfect for that crafting afternoon.
-
Dried Orange Slice Ornaments
Why you’ll love them:
These are not only beautiful and natural, but they also leave a wonderfully rich citrus scent throughout the house! They offer a rustic and bohemian feel, are 100% natural, and cost next to nothing.
What you need:
- Oranges (or lemons, grapefruits), baking paper
- An oven (or dehydrator)
- Jute string or thin ribbon, a large needle
- Optional: cloves, star anise, or cinnamon sticks
Implementation Steps (Easy and Aromatic!):
- Preheat the oven to a low temperature (around 100°C / 210°F).
- Slice the oranges thinly (about 3-5 mm). Try to make them uniform!
- Pat them dry a bit with kitchen paper to remove excess water.
- Arrange them on a baking tray lined with baking paper, ensuring they don’t touch each other.
- Bake for 3-5 hours, flipping them every hour, until they are dry and a dark golden color. (Note: ideally, dehydrate them the day before so they are ready for your crafting day).
- Once cool, make a small hole at the top with a large needle.
- Thread the string or ribbon through the hole and tie a knot to hang them.
My tip for a perfect result:
For an even more intense scent, poke cloves into the orange peel before dehydrating. Or tie a cinnamon stick or star anise alongside the ornament.
Not just for the tree:
They look great in garlands, tied to gifts, or as part of a centerpiece.
Benefit/Outcome:
Super economical, natural, and aromatic decor that adds a rustic, bohemian touch. Difficulty: Easy. Implementation Time: 15-20 minutes for assembly (after dehydration).
-
Salt Dough Ornaments (The Classic Salt Dough!)
Why you’ll love them:
This is a classic, and if you have children, it’s perfect to do with them! The result is durable ornaments that you can customize endlessly. They are super economical and have a ceramic-like texture, serving as a blank canvas for your creativity.
What you need:
- 1 cup salt, 2 cups flour, approx. 1 cup water
- Christmas-themed cookie cutters (stars, trees, bells)
- Straw or skewer for the hole
- Acrylic paint, glitter, varnish (optional)
Implementation Steps (Time to Knead!):
- In a large bowl, mix salt and flour.
- Add water gradually and knead until you have a smooth, elastic dough. Add a little more flour if too sticky, more water if too dry.
- On a lightly floured surface, roll out the dough to about 5 mm thick.
- Use cookie cutters to make your shapes.
- With a straw or skewer, make a hole at the top of each ornament.
- Place the ornaments on a baking tray lined with baking paper.
- Bake at a low temperature (120-150°C / 250-300°F) for 2-3 hours, or until hard and dry. (Time may vary). You can also air dry them for 2-3 days.
- Once cool and dry, it’s time to decorate! Use acrylic paint, glitter, markers… whatever you fancy. You can add a touch of varnish for durability.
- Thread string or ribbon through the hole to hang them.
My tip for a perfect result:
If you like a rustic look, leave them unpainted. Or try pressing small leaves or twigs into the dough before baking to leave their impression.
Not just for the tree:
They are also great as gift tags or in mini garlands.
Benefit/Outcome:
A versatile, inexpensive craft that produces durable, ceramic-like ornaments. Difficulty: Beginner. Implementation Time: 30 minutes preparation + baking/drying time.
-
Decorated Pinecone Ornaments
Why you’ll love them:
A timeless classic! Transform a simple pinecone into a festive gem. They bring nature indoors, are versatile, and match any color scheme you choose.
What you need:
- Pinecones of various sizes (collected on your walk!)
- Spray paint (white, silver, gold, copper)
- Glitter, craft glue or spray adhesive
- Ribbon or string
Implementation Steps (Nature in Your Hands!):
- Clean the pinecones thoroughly to remove dirt or insects. You can soak them in warm soapy water and then let them dry completely.
- In a well-ventilated area (or outdoors), spray them with your chosen spray paint. Apply thin coats and let them dry between coats to avoid drips.
- While the paint is slightly damp (or after a little spray glue), sprinkle glitter over them.
- Let them dry completely.
- Cut a piece of ribbon or string, tie a knot, and hot glue it to the top of the pinecone to hang.
My tip for a perfect result:
Combine pinecones of different colors (some white, some gold) for a livelier look. Or for a completely rustic feel, use only plaid or burlap ribbons without paint.
Not just for the tree:
They look lovely in decorative bowls, in centerpieces, or tied to garlands.
Benefit/Outcome:
Bring natural beauty indoors with these versatile, inexpensive ornaments. Difficulty: Easy. Implementation Time: 30-60 minutes (excluding paint drying).
-
Cinnamon Stick and Fabric Ornaments
Why you’ll love them:
These are not only beautiful, but they will also perfume your home with the delicious scent of cinnamon! Aromatic, rustic, and perfect for using up those fabric scraps you’ve been saving.
What you need:
- Large cinnamon sticks
- Fabric scraps (cotton, jute, linen… with festive prints!)
- Scissors, hot glue gun
- Jute twine or rough string
Implementation Steps (An Scent to Fall in Love With!):
- Cut fabric scraps into strips about 1-2 cm wide and 10-15 cm long. You’ll need several for each cinnamon stick.
- Using the hot glue gun, glue one end of a fabric strip to one end of the stick.
- Wrap the fabric around the stick decoratively, creating a spiral or covering only a part. Glue the end of the strip to secure it.
- Repeat with different fabric strips, playing with colors and textures. You can leave parts of the cinnamon stick exposed.
- Cut a piece of jute twine, make a loop, and glue it to the top of the stick to hang it.
My tip for a perfect result:
Combine plain fabrics with patterned ones. You can add small details like artificial berries or mini pinecones with hot glue.
Not just for the tree:
Hang them on doorknobs, or place them in a bowl as aromatic potpourri.
Benefit/Outcome:
Create beautiful, fragrant, and rustic ornaments using simple materials. Difficulty: Beginner. Implementation Time: 10-15 minutes per ornament.
Simple Yet Spectacular Garlands and Banners
Garlands are a must-have for decorating any corner: the tree, the fireplace, doors… These ideas are cheap and can be put together in a flash!
-
Popcorn and Cranberry Garland
Why you’ll love them:
A classic Christmas tradition that takes you back to childhood! A traditional, all-natural, inexpensive, and beautiful decoration with that white and red contrast!
What you need:
- Popcorn (without butter or salt, made the day before so it’s a bit harder and won’t break)
- Fresh cranberries (not frozen!), large needle with a large eye
- Strong thread (double sewing thread or fishing line for an invisible look)
Implementation Steps (A Fun Classic!):
- Cut a long piece of thread (whatever seems manageable, about 2 meters / 6.5 feet).
- Thread the needle. Make a thick knot at the end so the first pieces don’t slip off.
- Start threading the popcorn and cranberries, alternating them or creating the pattern you like best (e.g., 3 popcorns, 1 cranberry; 5 popcorns, 2 cranberries).
- For popcorn, try to thread through the center, which is the hardest part. For cranberries, just pierce them through.
- When you finish a piece of thread, knot it and start another if you need a longer garland.
My tip for a perfect result:
Make the popcorn the day before so it becomes a bit harder. If the cranberries are too soft, put them in the fridge for a while beforehand. For an extra touch, you can intersperse dried bay leaves.
Not just for the tree:
Looks great on the tree, around a window, above the fireplace, or on a staircase railing. (If outdoors, watch out for hungry birds).
Benefit/Outcome:
A beautiful, traditional, and natural garland perfect for a classic holiday look. Difficulty: Beginner. Implementation Time: 30-60 minutes, depending on desired length.
-
Recycled Paper Garland
Why you’ll love them:
An ecological and super customizable option, ideal for a rustic or vintage touch! It uses items you were going to throw away, is versatile, and creates lightweight garlands with a lot of character.
What you need:
- Pages from old books, musical scores, antique maps, leftover wrapping paper, magazines with nice photos
- Scissors, hole punch
- Glue stick or hot glue gun
- Thread or string
Implementation Steps (Give Paper a Second Life!):
- Choose the papers you’re going to use. Mix different types for a cooler effect!
- Cut the paper into desired shapes: circles, stars, trees, bells, or simple geometric figures. You can use a template or cookie cutter for uniformity.
- For a 3D effect, you can fold circles in half and glue several halves together.
- Punch a small hole at the top of each shape with the hole punch.
- Thread the shapes onto the string, leaving space between them, or glue them to a thicker string with a hot glue gun, ensuring they are well-spaced.
My tip for a perfect result:
For an express garland, cut long paper strips and make classic “paper chains” by joining the ends. Another idea is to cut “snowmen” or “tree” shapes and machine sew them with a long stitch for a super fluid garland!
Not just for the tree:
Looks great on an empty wall, above a window, or on the mantelpiece.
Benefit/Outcome:
An eco-friendly, versatile, and personalized garland that adds rustic or vintage charm. Difficulty: Beginner. Implementation Time: 45-90 minutes, depending on shape complexity.
-
Felt or Jute Fabric Banners
Why you’ll love them:
Banners are a cute way to display a festive message or simply add color. They are easy, super customizable, and last a long time. Felt is great because it doesn’t fray. Jute adds a rustic touch.
What you need:
- Felt in Christmas colors (red, green, white, gold) or jute fabric
- Triangle template (or desired shape)
- Scissors, hot glue gun or fabric glue
- String or ribbon
- Permanent fabric marker or pre-cut felt letters
Implementation Steps (Your Christmas Message!):
- Create a banner template on cardboard in your preferred size.
- Place the template on the felt or jute and cut out all the banner pieces you need for your message or desired length.
- If writing a message, use a fabric marker to put one letter on each banner piece (e.g., “MERRY CHRISTMAS”). If you have felt letters, glue them on.
- Apply a line of hot glue to the top back edge of each banner piece.
- Place the string or ribbon over the glue and fold the top edge of the banner piece over to adhere it to the string. Ensure they are well-spaced!
- Let the glue dry completely.
My tip for a perfect result:
Instead of a message, you can glue small shapes (stars, reindeer) on each banner piece. If using jute, you can fray the edges slightly for a more rustic look.
Not just for the tree:
On the wall, above a door frame, on the fireplace, or in the window.
Benefit/Outcome:
Easy-to-make, customizable, and durable banners that add color and festive messages. Difficulty: Easy. Implementation Time: 45-75 minutes.
Charming Centerpieces and Surface Decorations
Centerpieces and surface decorations are KEY to creating that festive atmosphere in any room. With very simple items, you can create impressive arrangements in the blink of an eye.
-
Centerpieces with Recycled Glass Jars (Your Mason Jars!)
Why you’ll love them:
Glass jars are incredibly versatile and economical, perfect for countless Christmas styles! You reuse containers you were going to throw away, you can customize them to your liking, and they create a super warm atmosphere with candlelight.
What you need:
- Glass jars of various sizes (Mason jars, jam jars)
- Tea lights or small candles (LED battery-operated is safer!)
- Epsom salts (bath salts for fake snow)
- Pine or fir sprigs, small pinecones, red berries (artificial or real)
- Jute twine, burlap or fabric ribbons
- Optional: spray paint (white, silver)
Implementation Steps (Snow and Nature!):
- Clean and dry the jars thoroughly.
- Pour a couple of centimeters of Epsom salts into the bottom of each jar to simulate snow.
- Place an LED battery-operated candle in the center of the “snow.”
- Around the candle, arrange pine sprigs, small pinecones, and berries to create a mini winter landscape.
- Optionally, tie a piece of jute twine or a burlap ribbon around the neck of the jar for a rustic touch.
Implementation Steps (Painted and Decorated Jar!):
- Clean and dry the jars thoroughly.
- If desired, spray the exterior with white spray paint for a frosted effect, or silver/gold for sparkle. Let dry.
- You can use stencils and fake snow spray to create designs.
- Once dry, tie festive fabric ribbons, jute twine, or glue small embellishments with hot glue.
- Place an LED candle inside.
My tip for a perfect result:
Group several jars of different sizes for a more eye-catching centerpiece. You can also fill them with small Christmas baubles or battery-operated fairy lights instead of candles.
Not just for the table:
Perfect for dinner, on the fireplace, on a shelf, or on a windowsill.
Benefit/Outcome:
Economical and customizable decorations that create a warm, natural ambiance. Difficulty: Beginner. Implementation Time: 15-30 minutes per jar.
-
Decorative Trays with Natural Elements and Candles
Why you’ll love them:
An elegant and super easy way to create a focal point on any table! Very simple to assemble, you can change the design to your liking and mix textures and colors for a spectacular look.
What you need:
- A nice tray (silver, wood, mirror, or even a cutting board)
- Candles of different sizes and shapes
- Pinecones, fir or pine branches, red berries (fresh or artificial)
- Loose Christmas baubles, cinnamon sticks, nuts
Implementation Steps (Your Corner of Magic!):
- Place the tray where you want it (table, fireplace). If using a mirror, the shine will be even greater!
- Start by placing the candles, arranging them beautifully (the largest ones in the center or in groups).
- Fill the gaps with green branches, creating a base.
- Add the pinecones, berries, baubles, and cinnamon sticks, distributing them evenly. Don’t be afraid to stack and overlap to add volume!
- Make sure nothing flammable is near the candles if you plan to light them (or use LED candles, which are safer!).
My tip for a perfect result:
Play with heights. Use different types of candles for visual interest. For a pop of color, you can add a long ribbon snaking through the elements.
Not just for the table:
Main centerpiece, on a side table, in the entryway furniture, or on a bedroom dresser.
Benefit/Outcome:
Create elegant and impressive focal points with natural elements and varying textures. Difficulty: Beginner. Implementation Time: 15-25 minutes.
-
Log or Wood Slice Candle Holders
Why you’ll love them:
A rustic and cozy element that brings the forest into your home! A natural and rustic touch, perfect for warm and traditional settings.
What you need:
- Small logs (about 10-15 cm / 4-6 inches high) or thick wood slices
- A drill with a bit sized for tea lights or small pillar candles (if you don’t have one, there’s an alternative)
- Tea lights or small pillar candles
Implementation Steps (with drill):
- Ensure the wood is well dried.
- Using the drill, make a hole in the top of the log or in the center of the wood slice, deep enough for the candle to fit snugly.
- Clean out the sawdust.
- Insert the candles.
Alternative without drill (Just as beautiful!):
- Simply place tea lights or small pillar candles on top of the wood slices.
- With hot glue, you can surround the base of the candle with dried moss, small pinecones, or berries to fix it and decorate it.
My tip for a perfect result:
Lightly sand the edges of the holes for a cleaner finish. Group several candle holders of different heights.
Not just for the table:
Centerpiece, fireplace mantel, shelves, bedside table.
Benefit/Outcome:
Adds a cozy, rustic, and natural touch to your home decor. Difficulty: Easy. Implementation Time: 10-20 minutes per piece (if you have wood and drill).
Additional Tips for a Perfect Crafting Afternoon
To make your festive creation afternoon even more productive and, above all, more fun, keep these friendly tips in mind:
- Involve the family! Christmas crafting is an ideal activity for all ages. Assign simple tasks to the little ones: sorting pinecones, threading popcorn, or painting salt dough ornaments. You’ll not only be making decorations, but you’ll be creating memories that will last a lifetime!
- Prepare your “base camp”: Before starting, clear a large table. Cover the surface with old newspapers or a plastic tablecloth to protect it from glues and paints. Have all your materials and tools within reach. An organized space reduces stress and makes you work faster.
- Don’t be afraid to improvise! Part of the fun is being ingenious. If you don’t have exactly what is suggested, look for a creative substitute. An old sock? It can be a snowman! A twig? Reindeer antlers!
- Think of a “theme”: To make your handmade decorations look coordinated and beautiful, choose a color palette or a general style. For example, “natural rustic” (pinecones, wood, jute) or “winter elegance” (white, silver, glitter).
- Reuse and Recycle: This is the soul of economical decoration. Look at every object with an artist’s eye: How can this be given a second life? How can something destined for the trash be transformed into something beautiful?
- Festive music and tasty snacks: Create the perfect atmosphere! Put on your favorite Christmas playlist, make some hot chocolate or warm cider, and have some sweets on hand. You’ll turn an afternoon of “work” into a party itself!
- Don’t aim for perfection: Handmade items have a unique charm, and that charm often lies in their small “imperfections.” Don’t stress about mistakes; on the contrary, celebrate them—they’re what make your creation unique!
- Take stock at the end: When you finish your session, take a look at what’s left over. It will help you plan for next year or for other crafts.
By following these tips, your crafting afternoon will not only be productive, but a truly festive and enriching experience!
Conclusion: The True Spirit of Handmade Festive Decoration
This post has guided you through a journey full of great ideas and ingenious solutions to make your home look spectacular this Christmas, all without hurting your wallet or stealing precious time. From those natural tree ornaments that exude an intoxicating scent, to recycled paper garlands that tell past stories, and centerpieces that blend the warmth of light with the freshness of nature… it has been demonstrated that beauty and festivity don’t have to be synonymous with overspending.
But beyond the economic savings, the true value of handmade decoration lies in the simple act of creating. Every pinecone you paint, every piece of fabric you knot, every jar you transform… carries a part of you: your time, your ingenuity, and your love. These pieces are not just decorations; they are expressions of your Christmas spirit, memories that begin to form from an afternoon shared with family or a moment of peace and concentration just for you.
That special atmosphere that only handmade items can provide… it’s incomparable! There’s an authenticity, a warmth, and a charm that mass-produced products can never replicate. Your guests will not only admire how beautiful your home looks but will also feel the energy and affection you’ve poured into every detail. This will make your home feel even cozier and filled with the spirit of Christmas.
By celebrating creativity and ingenuity during the most beautiful time of the year, you’re not just decorating your home; you’re building traditions, promoting conscious consumption, and cultivating deep personal satisfaction. These decorations you’ve created in a single afternoon will become part of your home’s story, a cherished and meaningful memory you’ll enjoy year after year. So, instead of worrying about shopping lists and prices, embrace the joy of making, the pleasure of shaping, and the satisfaction of transforming the everyday into something extraordinary—all with your own hands!
Happy holidays and happy crafting!