Illuminate Your Outdoors: Magical DIY Lighting Ideas for Gardens and Patios
Have you ever dreamed of transforming your garden, balcony, or patio into a magical corner as night falls? Outdoor lighting isn’t just about seeing where you step; it’s the soul of your outdoor space! It’s that magic wand that turns any corner into a dreamy oasis, a terrace into a dining room under the stars, or a simple path into an enchanting stroll. And best of all, you don’t need to be an expert or spend a fortune! With a little ingenuity, some basic supplies, and above all, a strong desire to add your personal touch, you can create wonders with your own hands. Forget boring catalogs; this is your moment to shine. Here, we’ll guide you step-by-step, from dreaming to bringing your lights to life, so you can create that perfect ambiance you’ve always envisioned.
Why Light Up Your Space Yourself? The Advantages of DIY Outdoor Lighting!
Deciding to go the “Do It Yourself” (DIY) route for your outdoor lighting is much more than saving money; it’s a statement of intent! It’s your opportunity to infuse your essence and a unique touch into that special place, something you rarely achieve with ready-made products.
Your Wallet Will Thank You
Let’s be honest, money matters, right? Cool lighting systems can cost an arm and a leg, not to mention the expense of professional installation. But if you get to work yourself, bingo! You can recycle, buy only the essentials, and skip installation costs. This way, that extra money can be invested in even prettier materials or another little something for your garden. Smart and economical!
Unleash Your Creativity
When you do it yourself, you are the designer! No catalogs hold you back. You can let your imagination run wild and create pieces that perfectly match the style of your home and garden. Are you into rustic? Mason jars and rope to the rescue! Are you more modern? How about experimenting with PVC pipes and LED lights? Your only limit is your mind. This personalization gives your space a character and a story that no generic product can tell.
The Satisfaction of Your Creation
There’s something magical about finishing a DIY project and seeing the result. Every time you enjoy your outdoor space, beautifully lit by your own hands, you’ll remember the care and creativity you put into it. That adds sentimental value and pride that goes beyond the material. It’s your vision brought to life!
A Nod to the Planet
Many of these DIY projects are a perfect excuse to recycle and give things a second life. Imagine transforming old wine bottles, cans, or pallets into spectacular luminaires. Less waste, more sustainability. And if you choose LED or solar lights, your carbon footprint will be minimal!
Flexibility That Adapts to You
Life changes, and so do your tastes. If tomorrow you want to change something, add a new light, or move another, it’s much easier if you set it up yourself! You can modify, expand, or renovate without hassle. That adaptability is pure gold for a garden that grows and evolves with you.
Getting Started! Planning Your Outdoor Lighting Haven
Before diving into assembly, good planning is your best ally for a successful DIY project. Thinking about design, utility, and especially safety from the outset will save you headaches and frustrations later on.
Surveying Your Space: What Do You Want to Illuminate?
Walk through your garden or patio with fresh eyes. Which areas need a touch of light? What story do you want to tell with that lighting?
- Key points to illuminate:
- Paths and entrances: To prevent tripping and look beautiful.
- Relaxation or dining areas: Your patio, terrace, balcony… to enjoy to the fullest!
- Architectural details: That textured wall, the main entrance… highlight them!
- Jewels of your landscape: Trees, shrubs, potted plants, fountains… let them be the protagonists!
- Stairs and elevation changes: Essential for nighttime safety!
- What’s Your Lighting Purpose?
- Safety: Ensure everything is visible and free of obstacles.
- Functionality: Light for your dinners or to read a book at night!
- Accent: Highlight those elements you love.
- Ambiance: Do you want something warm, festive, intimate? You decide!
Secrets for a Top Lighting Design
It’s not just about “installing lights,” but about creating a melody of light and shadow.
- Layers of light: Play with different types to add depth:
- Ambient (general) light: A soft base for the entire space (think string lights).
- Accent light: To highlight something specific (a small spotlight on your favorite plant).
- Task light: Where you need more brightness for a specific task (over the barbecue, for example).
- Safety light: To guide steps and deter intruders (path lights, with sensors).
- Not too much, not too little: Seek balance. Avoid dazzling zones or dark, cavernous corners.
- Size matters: Your lights should be proportionate to the space. A giant spotlight for a small pot can be excessive.
- The ‘mood’ and color of light:
- Warm white (2700K-3000K): The king of warmth! Perfect for creating that cozy, relaxing atmosphere we love so much.
- Neutral white (3500K-4000K): A clearer, more vibrant light, ideal for working or for the green of your plants to shine brightly.
- Cool white (over 4000K): Less common for relaxing ambiances, but can be used for very specific effects or security.

Where Will Your Magic Get Its Power?
The energy source you choose will define the type of DIY luminaires you can create.
- Solar: The ‘greenest’ and simplest option. They charge with the sun and turn on automatically at dusk. No cables, no complications! Ideal for accenting and marking paths, though they are not usually the most powerful.
- Low voltage (12V): Safety and power go hand in hand. You’ll need a transformer to lower your household current to 12V. It’s much safer to install than high voltage and gives you more flexibility than solar lights. Perfect for brighter paths, spotlights, and deck lights. Requires simple wiring that you can bury.
- Standard voltage (120V/220V): Maximum power, maximum caution. This is the same current as your house. It offers the highest power, but beware! Installation must be done with great care, and if you don’t have experience, it’s best to have an electrician help you. You’ll need outdoor outlets with GFCI protection (a safety switch) and robust, well-buried wiring. It’s typically used for powerful security lights or your most festive string lights.
Your DIYer’s Starter Kit
With your plan in mind, it’s time to gather your treasures!
- Light sources: LED strips, LED spotlights, LED bulbs, solar lights (you can disassemble them), string lights, LED candles.
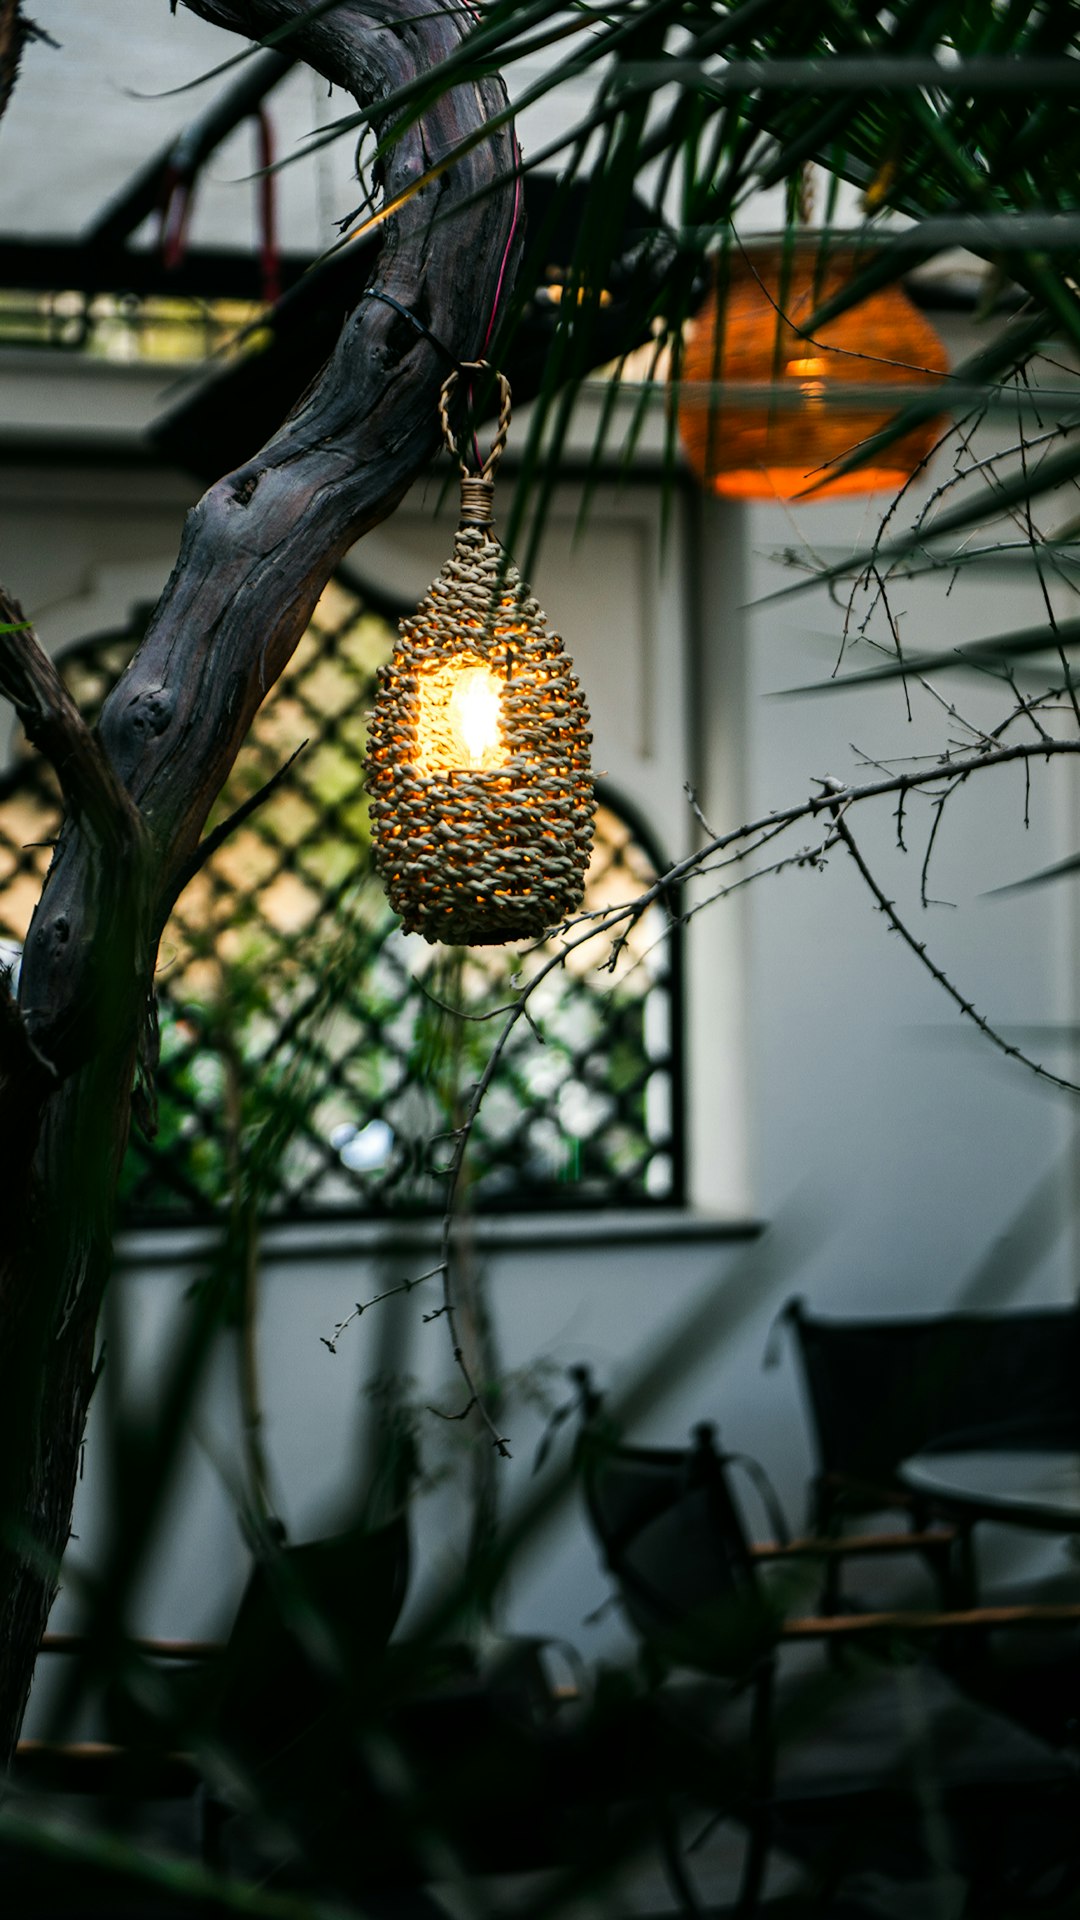
- For the ‘body’ of your lights: Glass jars, cans, bottles, PVC pipes, pallet wood, bamboo, rope, wire, fabric.
- Electrical stuff (if needed): Outdoor cable (suitable for burying if low voltage), waterproof connectors, a transformer (for low voltage), outdoor GFCI outlets, electrical tape.
- Supports and how you’ll fix them: Stakes, hooks, wall mounts, wooden or metal posts, cement (for bases).
- Basic tools: Pliers, wire strippers, screwdrivers, drill, saw, scissors, measuring tape, level.
- For the finishing touch: Outdoor spray paint, waterproof sealant, sandpaper, strong outdoor glue.
- And most importantly, your safety! Gloves, safety glasses.
Let There Be Light! Brilliant DIY Outdoor Ideas
Now that you have everything planned, it’s time to ignite the spark of creativity! Here are plenty of DIY outdoor lighting ideas, categorized by type, to inspire you.
1. The Magic of the Sun: Solar-Powered Wonders
Solar lights are the easiest to assemble and maintain; perfect for those seeking simplicity and being planet-friendly!
- Mason Jar Solar Lanterns: A classic that never fails. You’ll need glass jars (Mason or any you like), inexpensive solar garden lights (you only need the lid with the solar panel and the bulb/battery), and something to hang or decorate with.
- How to do it: Disassemble the top part of a solar garden light. Fix that unit to the jar lid (you can glue it or drill a hole). Decorate the jar inside or out with matte paint, twine, lace, dried leaves, or pebbles. Close the lid. Now you can hang them from a tree with a wire handle or place them on tables or along a path!
- Watering Cans That Pour Light: A beautiful idea for a touch of fantasy!
- How to do it: Grab an old watering can (or buy a cheap one). Insert a string of thin-wire solar LED fairy lights through the spout of the watering can, letting the lights “pour out” like water. Hang it from a high hook or plant hanger to create a spectacular cascade of light.
- Artfully Perforated Cans: A recycling project with a ‘wow’ result!
- How to do it: Save different sized tin cans, clean them well, and remove the labels. Fill them with water and put them in the freezer (this prevents them from deforming when perforated). Using a hammer and nails of different sizes, create patterns (stars, dots, spirals) on the can. Once thawed, paint them with outdoor spray paint. Inside, place small solar garden lights (with the solar panel peeking out the top) or solar LED candles. You can hang them or leave them on the ground!
- Wine Bottles with Lights and Rustic Charm: Give your empty bottles a new life.
- How to do it: Clean the wine bottles. Insert solar fairy light strings that come with a cork stopper containing the solar panel. For a more rustic touch, you can wrap the outside of the bottle with jute or sisal rope, securing it with a good outdoor adhesive.
2. String Lights: Guaranteed Festivity and Warmth!
String lights are super versatile and transform any outdoor space into a festive and cozy place, whether it’s your patio, pergola, or balcony.
- Classic ‘Cafe’ or ‘Bistro’ Lights: Those large, round bulbs that remind us of a European terrace.
- How to install them: String them across your patio, pergola, or gazebo. Don’t have anywhere to hang them? No problem! You can create your own support posts.
- DIY Posts for Your String Lights:
- How to make them:
- Option 1 (Bucket and Cement Bases): You’ll need large plastic buckets, wooden or metal posts (2.5 to 3 meters high), quick-setting cement, and eye hooks. Place the post in the center of the bucket, pour in the cement, and let it dry. Screw an eye hook into the top of the post to hang the string lights. You can paint the buckets or cover them with fabric to make them look prettier!
- Option 2 (Heavy Planter Supports): Use large, heavy terracotta planters. Insert a wooden post and fill the planter with soil, sand, and rocks to make it very stable. And ready to hang your lights!
- How to make them:
- Net Lights for Your Shrubs or Vines: If you want to cover a large area with uniform light, these are your solution!
- How to do it: Simply spread the nets over shrubs, hedges, or pergolas with vines to create a soft, enveloping glow. Make sure they are suitable for outdoor use and water-resistant.
3. Give Them a Second Life: Lighting with Recycled Objects
Transform the old into something new and create luminaires with unique character and personality.
- Perforated Can Lanterns (with LED Candles): Like the solar version, but using LED candles for a warmer, safer flicker.
- How to do it: Follow the steps for perforated cans. Instead of solar lights, place flameless LED candles inside. They are safe, wind-resistant, and don’t make a mess.
- Rustic Wine Bottle Torches: Create dramatic and charming lighting (but with great, great caution regarding fire!).
- How to do it: You’ll need clean wine bottles, torch wicks, wick holders (usually metal or ceramic), torch oil, and, if you wish, metal brackets to fix the bottles to a wall or fence. Insert the wick with its holder into the mouth of the bottle, ensuring it fits snugly. Fill the bottle with torch oil. Never leave these torches unattended and keep them away from any flammable materials!
- Pallet Wood Lighting: Pallets are a treasure trove of creativity.
- How to do it: Disassemble a pallet or use sections. You can integrate waterproof LED light strips or small puck lights into the grooves or between the planks to create light panels, an illuminated path, or a wall backdrop with very soft lighting. Sand and seal the wood to protect it from the weather.
- PVC Pipe Luminaries: For a more modern and minimalist style.
- How to do it: Cut PVC pipes into different lengths. You can drill patterns, cut shapes, or simply paint the pipes. Insert small LED lights or solar fairy light strings inside. They can be garden stakes, hanging lanterns, or light art pieces.
4. Low-Voltage Projects: More Light with DIY Safety
Low-voltage lighting strikes a perfect balance: easy to DIY and with greater light output.
- Lighting for Your Paths and Gardens: Low-voltage kits are your ideal starting point.
- How to do it: Buy a kit that includes a transformer, low-voltage cable, and several luminaires. Choose those you can customize. Dig a small trench to bury the cable. Connect the cable to the lights and the transformer following the instructions. Ensure all connections are well-sealed and waterproof. You can create your own decorative covers for the lights or integrate the LED bulbs into DIY structures like faux rocks or small wooden posts.
- Deck and Stair Lighting: More safety and ambiance in your elevated areas!
- How to do it: Use waterproof LED strip lights or small, recessed low-voltage puck lights. Fix them under deck railings, along stair treads, or on deck edges for a subtle glow and perfect visibility. Ensure the wiring is well-hidden and protected.
5. Containers and Pots: Light Blooms in Your Garden!
Integrating light directly into your pots and planters adds a magical touch to your plants.
- Glowing Planters:
- How to do it: You can place waterproof LED strips around the inner rim of large pots or at the base, directing light upwards to illuminate your plants. Another idea is to drill small holes in the body of the pot (if it’s plastic or metal) and thread small fairy lights through.
- Fairy Lights in Your Potted Plants:
- How to do it: Simply intertwine delicate fairy light strings (many are solar or battery-powered) among the branches and leaves of your potted plants. This looks beautiful with dense foliage plants or small trees.
- Illuminated Water Features: If you have a fountain or a pond, submersible lights can create a dazzling effect.
- How to do it: Use small submersible LED lights (usually low-voltage or battery-powered) to illuminate the water or waterfalls from below, creating an ethereal glow and enhancing the movement of the water.
6. Elements of Fire and Light: Warmth and Charm
Combine the warmth and light of fire for a truly cozy experience (safety is CRITICAL here!).
- DIY Fire Pits: Build a fire pit from stone or concrete blocks. While the main light is the fire, you can add low-voltage or solar lights around to accent the area and provide soft ambient light when there’s no fire. Keep lights at a safe distance from flames and heat!
- Tabletop Fire Bowls:
- How to do it: Use a heat-resistant ceramic or metal bowl. You can fill it with decorative stones and a gel fuel or bioethanol burner for a controlled flame. For a DIY touch, adorn the outside of the bowl with mosaics or heat-resistant paint.
- Candles and LED Candles: An Intimate Embrace: For an intimate atmosphere that you can move around.
- How to do it: Group different sized candles on fire-resistant trays or in individual candle holders. To avoid fire hazards, especially if it’s windy or there are children and pets nearby, use flameless LED candles. They mimic the flicker of a real candle, and many are remote or timer controlled.
Secrets for Long-Lasting DIY Outdoor Lighting Success
Creativity is great, but safety, durability, and efficiency are the pillars of a DIY project that will make you happy for a long time.
1. Safety First!
Electricity and fire can be dangerous if not handled properly. Never underestimate the importance of safety!
- Everything for outdoors: Make sure the cables, plugs, lights, and connectors you use are specifically designed for outdoor use. They must be water and weather-resistant (look for an IP rating, such as IP44 or higher).
- GFCI protection (or residual current device): If working with high voltage (120V/220V), ALWAYS use GFCI outlets! These cut off power instantly if they detect a problem, preventing shocks.
- Well-sealed connections: All cable splices must be waterproof. Use silicone-sealed connectors or protective covers to prevent any moisture from entering.
- Properly buried cables: For low-voltage systems, bury cables at a safe depth (at least a few inches) to protect them. If it’s high voltage, consult local regulations; depth and conduit type may be stricter.
- Fire safety: If using oil torches, candles, or DIY fire pits, maintain a safe distance from anything that can burn (dry plants, furniture, fabrics). Never leave open flames unattended! And make sure the surface you place them on is heat-resistant.
2. Built to Last: Weather Resistance
The outdoors is tough. Your creations must be prepared for sun, rain, and whatever comes their way.
- Extra sealing: Apply waterproof sealants to any wooden parts or porous materials. Light housings must be well-sealed to prevent water from entering.
- Rust-resistant materials: Choose metals like aluminum, stainless steel, or copper. If using other metals, paint them with anti-corrosion paint.
- Let the water flow! If you make containers for your lights, make sure they have drainage holes to prevent water accumulation.
3. Shine Bright Without Waste! Efficiency and Automation
Make your lighting smart and economical to use.
- The magic of LED: Whenever possible, use LED lights or strips! They consume very little power, last forever, and generate hardly any heat.
- Harness the sun: For areas where you don’t need much light or where wiring is tricky, solar lights are perfect! They are free to operate.
- Timers and sensors: Install timers so your lights turn on and off automatically. Dusk-to-dawn sensors are ideal for ensuring they only operate when needed. And motion sensors are a bonus for security on paths or entrances.
4. A Little Love: Regular Maintenance
Even DIY creations need a bit of tender loving care to keep looking spectacular.
- Cleaning: Clean your lights regularly, especially solar panels and bulb covers, to ensure maximum performance.
- Inspection: Periodically check wiring for damage, connections for rust, and lights for signs of wear.
- Replacement: Change bulbs or batteries (in the case of solar lights) when necessary. Make sure to use the correct ones!
Your Artistic Touch! Creative Placement and Design Techniques
Once your lights are ready, the way you place and direct them can radically change the feel of your space.
- Up-lighting: Place a spotlight on the ground, pointing upwards, to illuminate the base of a tree, a textured wall, or an architectural element. It creates incredible shadows and enhances height.
- Down-lighting or “moonlight”: Install lights high in a tree or structure, directing light downwards to simulate moonlight. This creates a soft, diffused ambiance with beautiful natural shadows.
- Silhouetting: Place a bright light behind an interesting object (a statue, a peculiar shrub, a trellis) to create a dark, dramatic silhouette against an illuminated background.
- Grazing: Install lights very close to a textured surface (like a stone or brick wall) so that the light skims across it. This enhances texture and creates a fascinating interplay of light and shadow!
- The play of shadows: Use objects (plants, sculptures, trellises) strategically placed between the light and a surface (a wall or the ground) to cast fun shadows and decorative patterns.
- Path and border lighting: Place low lights along paths, flowerbeds, or edges to guide footsteps and define the boundaries of your space. It’s functional and very beautiful at the same time.
- Focal points: Direct light towards the most beautiful elements of your garden or patio, such as a fountain, a sculpture, a majestic tree, or your seating area, to draw all eyes there.
- The color of light for every emotion: Remember what we discussed in planning. Use warm light (2700K-3000K) to create that cozy atmosphere in your gathering areas. And if you dare, experiment with subtle colored lights for special occasions or to highlight certain plants.
Your Own Nighttime Paradise Awaits!
DIY outdoor lighting is a wonderful adventure that allows you to transform your outdoor space into a magical and personal extension of your home. From the soft glow of your solar jars to the joy of your string lights, or the dramatic dance of light and shadow from your torches, the possibilities are as vast as your imagination. By embarking on these projects, you will not only save money and be more environmentally friendly, but you will also pour your heart and soul into every illuminated corner.
Remember that careful planning, attention to safety, and choosing the right outdoor materials are just as important as your creativity. With all these ideas and tips, you have everything you need to start designing and building your own nighttime paradise. Dare to experiment, recycle, and personalize, and soon you’ll be able to sit under the glow of your own creations, enjoying a perfect and unique ambiance, custom-made for you and your home. Ignite your ingenuity, illuminate your space, and transform your outdoor nights into truly unforgettable experiences!