Your Workshop at Pro Level! Organize and Label Your Tools Like a Pro
Let’s be honest. In the world of DIY and manual labor, there are those who enjoy creating things… and then there are those who *truly* enjoy it, the ones who don’t waste a minute looking for a screwdriver. What’s the difference? It’s not just talent; it’s organization! A chaotic workshop is synonymous with headaches, wasted time that you could be using to advance your project, and even a scare or two. In contrast, an impeccable space, where every tool greets you from its place, is the hallmark of a true *pro*. If you want to transform your workshop from a “battleground” to a “sanctuary of productivity” (and safety, which is key!), this is your place. Let’s dive into all the tricks for labeling and storing your tools like a true expert.

I. The Organized Workshop Mindset: Beyond “Just Not Lying Around”
For someone who takes their work (or hobby) seriously, organizing isn’t something you do “when you have time.” It’s part of the essence! Understanding *why* it’s so important to have your tools well-labeled and stored is the first step to changing your mindset.
- Next-Level Efficiency: Imagine this: finding that wrench in seconds or minutes? That small difference translates into hours and hours of your valuable time recovered throughout the year. A good system cuts interruptions and allows you to work without brakes.
- Goodbye to Accidents: Tools left lying around or poorly stored are a magnet for trips, cuts, or falls. Top-notch storage saves you from accidents and ensures that dangerous items are safely put away.
- Your Tools Will Last Longer: Do you want your investment to pay off? Protect your tools from dust, humidity, bumps, and rust. Organizing means taking care of them, and taking care of them ensures they are always ready for action.
- Save Money and Time (Literally!): How many times have you bought something you already had because you couldn’t find it? Or had to replace a tool that was damaged because it was poorly stored? There’s tangible savings! And time, my friend, is pure gold. An organized workshop multiplies your gold.
- Pride and Professionalism: An immaculate workspace not only gives you confidence but also impresses anyone who visits. It reflects that you are someone who values quality and pays attention to every detail.
The goal is for this system to become so natural that it feels like second nature. It’s about turning the saying “a place for everything, and everything in its place” into an art.
II. Fundamentals for a Truly Organized Workshop
Before you get caught up in labeling and shelving, you need to lay the groundwork. A true professional first assesses their space and resources.
2.1. A Complete Scan of Your Space and Inventory
Start with a total audit of your workshop.
- Dimensions and Layout: Grab a tape measure and measure everything: walls, ceiling, floor. Think about where the windows, outlets, lights, and doors are. A simple drawing can be your best friend.
- Strategic Zones (Almost Like a Battlefield!): Divide your workshop into logical “zones” or “stations.” For example: a wood zone (saws, planers), another for metal (grinders, welding), another for electronics (multimeters), and a corner for assembly or finishing projects. Grouping tools by what they do or by project type saves you unnecessary trips.
- Your Workflow: Think about how you move around the workshop when you’re busy. Tools you use daily should be at hand, close to their work area.
2.2. Inventory and Classification of Your Arsenal! (Work Tools, Of Course)
A comprehensive inventory is the starting point.
- Take EVERYTHING Out: Yes, you heard right. Take *every single one* of your tools out. Empty drawers, shelves, boxes. It might seem like Mount Everest, but it’s vital for reorganization to work.
- Provisional Grouping: Start grouping them into large categories: hand tools (wrenches, screwdrivers), power tools (drills, saws), measuring tools (tape measures, calipers), consumables (screws, sandpaper), specialized tools, etc.
- Condition Check: Examine each tool. Is it in good condition? Does it work? Does it need repair or maintenance? Do you have two of the same? Be honest. Those that don’t work or haven’t been used in years should either be repaired, donated, sold, or thrown away. A professional does not collect junk.
- Frequency of Use: Mark which ones you use daily, weekly, monthly, or almost never. This clue will be key to deciding where they will live.
2.3. The Magic of the “5S” Methodology for Your Pro Workshop
This comes from Japanese factories and is a brutal framework for organizing your workshop.
- Seiri (Sort): Get rid of what isn’t needed. (You already did this by inventorying and discarding!).
- Seiton (Set in order): A place for everything, and everything in its place. (This is where labels and storage come in!).
- Seiso (Shine): Keep everything spotless. (Clean tools before storing them).
- Seiketsu (Standardize): Create your own rules and routines to maintain order. (Labeling systems you always use).
- Shitsuke (Sustain): The consistency to follow your own system. (Making it a pro habit).
III. Pro Labeling Strategies: Give Your Workshop a Voice
A good labeling system is the language of your workshop, telling you directly where everything is. The keys are: clarity, durability, and consistency.
3.1. The Basics for Good Labeling
- Clarity and To the Point: Use simple, direct words. No strange abbreviations.
- Visibility: Labels should be readable at a glance, without having to get too close. Think about font size and color contrast.
- Durability: Workshop labels must withstand dust, grease, humidity, and daily use.
- Consistency: Maintain the same style for all (font type, size, placement). This will make it easier to find what you’re looking for and reinforce the system.
3.2. Types of Labels and Where to Use Them Like a Pro
Choosing the right label depends on where you’re going to put it and what it’s for.
Printed Labels with Machines (The Famous “Label Makers”!)
- Pros: Look super professional and clean, very legible, available in many sizes and tape colors, and laminated ones resist abrasion, chemicals, and water. Ideal for drawers, shelves, organizer boxes, and tool cases.
- Cons: You have to spend a bit initially on the machine and tapes. Some tapes may peel off on very rough surfaces.
- Pro Tip: Invest in a decent label maker that uses laminated vinyl adhesive tapes. For smooth metal or plastic, they are the best.
Vinyl or Laminated PVC Labels (PRO Level)
- Pros: Extremely durable! You can design them to your liking (size, color, logos, icons), they withstand almost anything. Perfect for tool boards, walls, or large containers.
- Cons: Require design and sometimes outsourcing production, which can be more expensive and less agile if you want to make quick changes.
- Pro Tip: Use them for the most important and permanent labels, such as those for work zones or shadow boards.
Permanent or Paint Markers
- Pros: Cheap, fast, useful for directly marking tools or temporary containers.
- Cons: Less durable, can be erased or smudged. And if you make a mistake, goodbye! The lettering may not look as good.
- Pro Tip: Use them wisely, in places that are not touched much or for internal markings that don’t need to be perfect.
Color Codes
- Pros: Very fast visual identification from a distance. Great for grouping tools by type, frequent use, or even for each team member. Combine them with text labels.
- Cons: Sometimes you have to paint or apply colored tapes, and the meaning of each color must be clear to everyone in the workshop.
- Pro Tip: For example, red for electrical, blue for plumbing, green for woodworking. Paint tool handles or put colored tape on shelves.
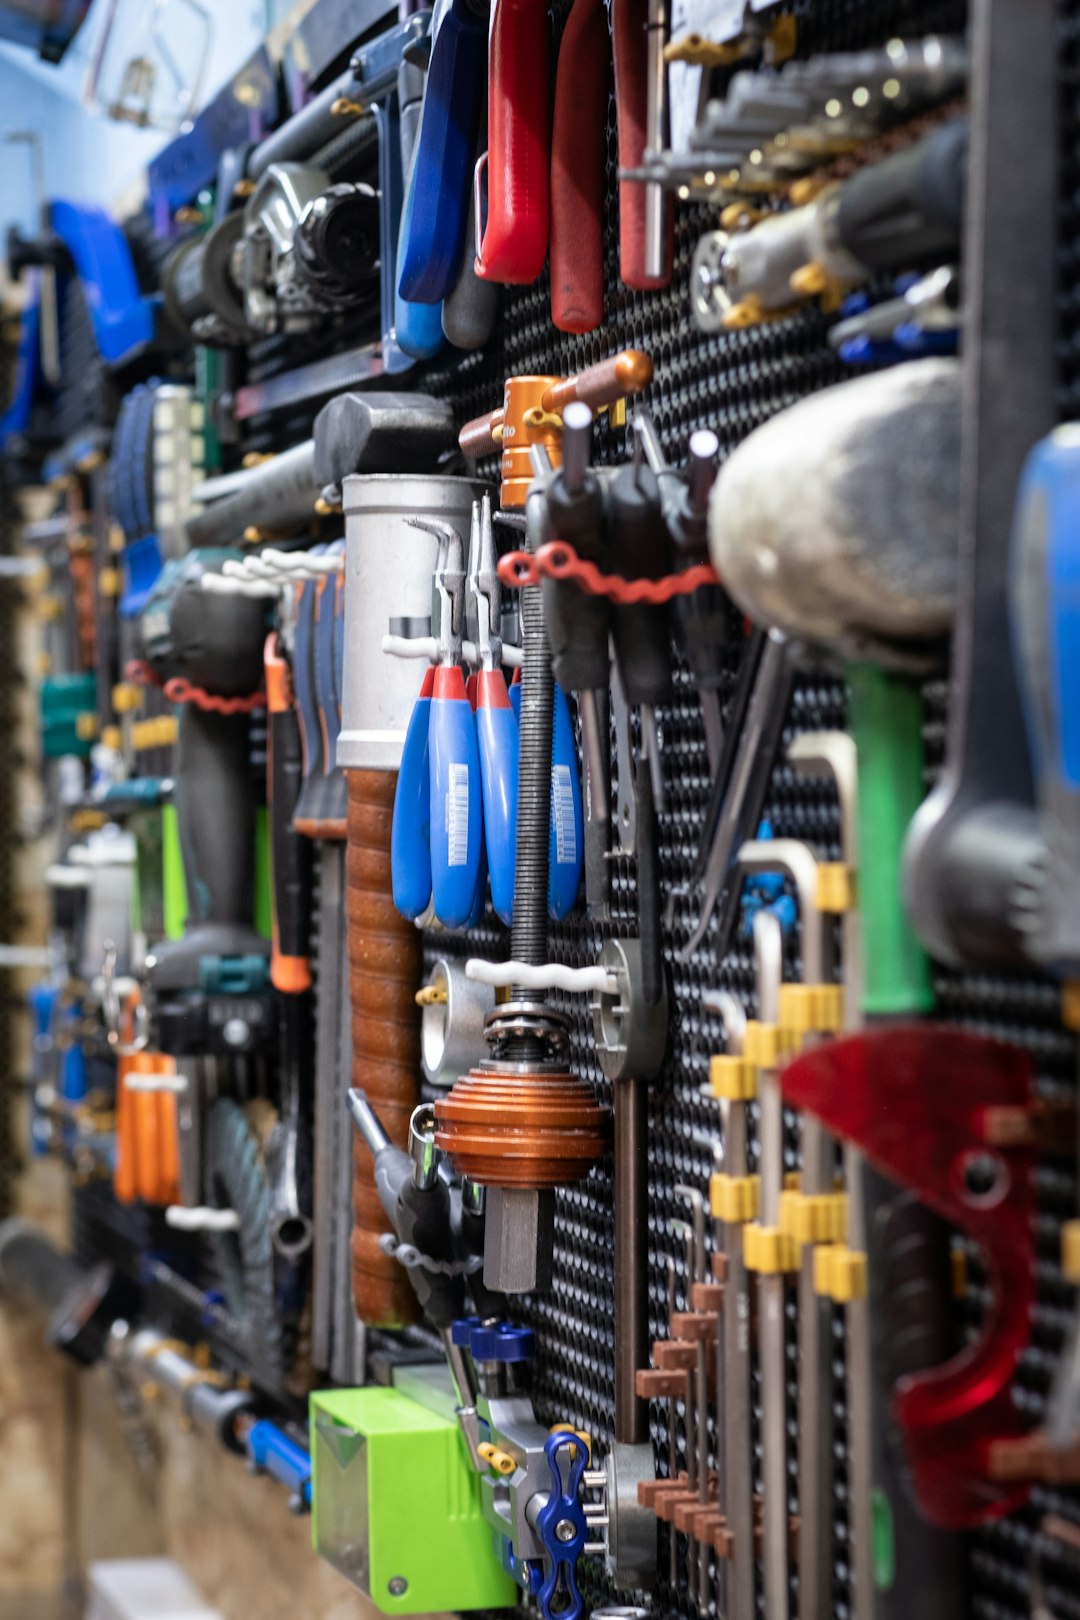
The “Shadow Board” Technique: The Visual Crown Jewel
- What It Is: Amazing! It involves drawing the silhouette of each tool directly on the panel where you store it (usually a pegboard or wooden board). You hang the tool over its drawing, and if it’s not there, you see the “shadow” that’s missing!
- Materials: Pegboard, MDF wood, contrasting spray paint, hooks and holders.
- How It’s Done:
- Fix the board to the wall.
- Arrange the tools logically on the board.
- With a pencil, carefully draw the outline of each one.
- Remove the tools and paint the inside of each silhouette with a color that stands out sharply against the background (e.g., black on white, or red on wood).
- Once dry, place a text label below or next to each silhouette with the tool’s name.
- Install the hooks so that the tool fits perfectly over its shadow.
- Benefits That Will Leave You Speechless:
- You’ll Know Instantly If Something Is Missing: Impossible not to notice if a tool is gone.
- Returns to Its Exact Place: The tool always goes back to the same spot, in the same position.
- Maximum Visual Organization: Speeds up your work by reducing search time to zero.
- Pure Professional Aesthetics: Your workshop will look like it’s from a magazine! Any professional will admire it.
- Pro Tip: For tools with complex shapes, consider cutting foam or PVC to fit inside the shadow.
3.3. What to Label and Where?
- Drawers and Compartments: Place a clear label on the outside of each drawer with its contents (e.g., “Combination Wrenches,” “Philips Screwdrivers,” “Metal Drill Bits”).
- Containers and Boxes: If you use containers for screws, washers, connectors, etc., label each one. If they are transparent, the label can be smaller, but just as important.
- Shelves: Label shelf sections for larger tools or bulky items (e.g., “Battery Chargers,” “Sandpaper,” “Wood Scraps”).
- Portable Tool Cases and Boxes: Identify the main contents of each case (e.g., “Electrical Kit,” “Mobile Plumbing Kit”).
- Even Tools (With Care): If you have identical tools but for different uses (e.g., two sets of chisels, one for soft wood and one for hard wood), a small label or color code can be the solution.
IV. Professional Storage Systems: The Art of Having Everything at Hand
Good storage protects your tools and puts them at your fingertips. For a professional, it’s an investment in efficiency and durability.
4.1. The Basics for Smart Storage
- Easy Access: The tools you use most often should be retrievable with your eyes closed.
- Total Protection: Store everything in a way that protects it from dust, humidity, rust, and bumps.
- Utilize Every Millimeter: Make the most of your space, both vertically and horizontally.
- Logical Storage: Group tools by their function, project type, or frequency of use.
4.2. Types of Storage and How to Use Them Like a Pro
4.2.1. Tool Chests and Cabinets
- What They Are: Furniture with many drawers of different depths, often with wheels for mobility. They come in all sizes.
- Keys to Choosing Well:
- Ball-Bearing Slides: Essential! They ensure drawers open and close smoothly and last, even when fully loaded.
- Safety Latches: To prevent drawers from opening when moved and for protection.
- Drawer Liners: Rubber or foam mats that protect your tools and the drawer from wear, and prevent items from scattering.
- Robust Construction: Thick gauge steel, to withstand a lifetime of use!
- Pro-Level Internal Organization:
- Dividers: Use dividers for small tools or complete sets.
- Custom-Cut Foam Trays (The Holy Grail!): The definitive method for organizing delicate tools or sets (e.g., socket wrenches). Purchase double-layer foam and cut the outline of each tool with a utility knife. It creates a perfect nest that protects them and instantly tells you if something is missing! The color contrast between foam layers further highlights the absence of a tool.
- Smart Grouping: Dedicate entire drawers to tool families (e.g., one drawer just for wrenches, another for pliers, another for hammers). The top drawers are for what you use most often.
4.2.2. Pegboards and French Cleat Systems
- What They Are: Solutions for using wall space and gaining vertical storage.
- Pegboards:
- Advantages: Inexpensive, versatile, easy to install and modify with lots of hooks. Everything is instantly visible!
- Pro Application: Fantastic for frequently used hand tools. Combine them with a “shadow board” for a spectacular effect. Use quality metal hooks.
- French Cleats:
- What They Are: A modular system with angled wooden strips (cleats) on the wall, and similar strips on the back of your shelves, cabinets, or custom supports. This allows you to easily move and reorganize things on the wall.
- Advantages: Super strong, look great (especially in wood), and you can make custom supports for large or heavy tools.
- Pro Application: Ideal for power tools, special jigs, project boxes, or even mobile storage systems that you can hang on the wall.
4.2.3. Shelving Units and Racks
- What They Are: Furniture for storing larger tools and equipment, bulky materials, or stock.
- Materials: Steel (for very heavy items), wood (for medium or light loads).
- Things to Consider:
- Weight Capacity: Make sure the shelves can support what you’re going to put on them.
- Safety: Anchor shelves to the wall! This prevents them from falling, especially if you have children or live in an earthquake-prone area.
- Containers: Use transparent or well-labeled boxes on shelves for small or grouped items.
4.2.4. Tool Carts
- What They Are: Units with wheels that combine drawers with a work surface on top.
- Advantages: Unbeatable for mobility! You take all the necessary tools directly to your work area, saving trips and time on large projects or workshops with multiple stations.
- Pro Application: Essential for electricians, mechanics, or anyone who moves around a lot. The top surface can be wood, steel, or rubber, perfect for resting tools or small parts.
4.2.5. Portable Toolboxes/Cases
- What They Are: For tools you need to take outside the workshop or to create specific “project kits.”
- Types: From simple plastic boxes to stackable modular systems (like those from Milwaukee, DeWalt, Festool) and aluminum cases for delicate tools.
- Organization: It’s vital that these boxes are also organized internally! With trays, dividers, or custom-cut foam so tools don’t get damaged during transport. Label each case well on the outside to quickly know what’s inside.
4.2.6. Specialized Storage (The Extra Tricks)
- Magnetic Bars: For drill bits, screwdriver bits, chisels, or any small metal tool. Quick access and everything visible.
- Small Parts Organizers: Boxes with fixed or adjustable compartments for screws, nuts, washers, electrical connectors, etc. Transparent and labeled ones are best.
- Long Tool Holders: For brooms, shovels, garden tools, or wood strips.
- Rotating Organizers (Towers): To store many small tools in little space, such as router bits or drill bits.
4.3. Maximize Vertical Space and Prioritize Safety
- Utilize Height: In small workshops, vertical space is gold. Use tall shelves, wall panels, and ceiling hooks for tools you use very occasionally or for materials.
- Safety First:
- Sharp Tools: Store knives, chisels, and saws with edge protectors or in individual sheaths to prevent accidents and keep the edge intact.
- Power Tools: Store them in their own cases or in closed cabinets to protect them from dust and moisture. Cables should always be neatly coiled.
- Hazardous Materials: Flammable liquids, paints, and aerosols must be in well-ventilated fire-resistant cabinets, away from any heat source.
V. Maintenance as Part of Your Professional Ritual
Organizing doesn’t end when you put everything in its place. Maintaining your tools and your system in shape is key to long-term success.
5.1. Clean and Care for Your Tools Before Storing Them
- The Professional’s Golden Rule: “After Each Use”: Before returning a tool to its home, clean it. It’s a sacred habit!
- Remove Dirt: Get rid of dust, sawdust, metal shavings, grease, or material residues. A brush, compressed air, or a damp cloth (and then dry thoroughly) are your allies.
- Rust Protection: Metal tools should be cleaned and, if necessary, given a thin coat of protective oil (3-in-1, WD-40) before storing them, especially if your workshop is humid.
- Quick Check: Take this moment for a quick check. Is it sharp? Is the cable okay? Does it need any adjustment?
5.2. Preventive Maintenance for Your Organization System
- Periodic Review of Your Domain: At least once a month, take a critical look around your workshop.
- Are tools being returned to their correct place?
- Is there an area that consistently gets cluttered? (This may indicate a flaw in the system design or tool placement).
- Are the labels still legible and adhered?
- Has your way of working changed, making a location less practical?
- Adjust and Adapt: Your workshop and projects will evolve. Your organization system must be flexible enough to grow with you. Don’t be afraid to move tools or re-label drawers if you find a more efficient way.
5.3. Discard and Renew
- Don’t Accumulate: Broken, unusable, or obsolete tools only take up space and create chaos. Repair them, recycle them, or dispose of them properly.
- Renew Strategically: If a tool is constantly failing you or isn’t efficient, it’s time to replace it with a quality one that truly works for you. A professional does not work with shoddy equipment.
VI. The Philosophy and Habits of the Workshop Professional: The Discipline of the Master
Implementing a labeling and storage system is just the beginning. True mastery lies in the discipline and mindset that keeps it alive.
6.1. Consistency and Discipline: The Secret to Lasting Success
- “A place for everything and everything in its place”: This mantra should be your guide. The key is to put every tool away *immediately* after using it. Don’t leave it out “for a moment.”
- Daily/Weekly Routines: Dedicate the last 5-10 minutes of each workday to tidying and cleaning your space. A deeper clean can be a weekly task. These small time investments prevent clutter from accumulating.
- Make It a Habit: Initially, you may need a conscious reminder. But over time, returning tools to their place will become automatic, as natural as using them.
6.2. Investment in Quality Storage Systems
- It’s Not an Expense, It’s an Investment: View the purchase of good tool chests, robust shelving, or foam systems as a smart investment. It extends the life of your tools, increases your efficiency, and improves safety. The investment quickly pays for itself in time saved and damages avoided.
- Ergonomics: Think about the height of your workbenches, the ease of reaching tools, and how to reduce physical strain. A well-organized workshop is also a workshop that takes care of your body.
6.3. Adaptation and Evolution
- Your Workshop is Alive: Your workshop is not static. With every new project, every new tool, or every change in your working method, your organization system must be flexible enough to adapt.
- Continuous Improvement: Don’t expect everything to be perfect from day one. Test your system, look for weak points, and constantly improve. The pursuit of efficiency is a never-ending journey.
6.4. Pride in Your Workspace
- A Reflection of Your Craft: An organized workshop is a testament to the respect you have for your trade. It demonstrates your professionalism, attention to detail, and commitment to excellence.
- Less Stress, More Creativity: An organized environment reduces stress and frustration, freeing your mind to concentrate on being creative and solving problems.
- Inspire Others: An exemplary workshop not only benefits you but can also be a source of inspiration for colleagues, apprentices, or clients.
VII. Conclusion
Transforming your workshop into a sanctuary of efficiency and safety is a journey that requires planning, discipline, and the right techniques. Labeling and storing your tools like a true professional goes far beyond simply putting things in a drawer. It involves a critical look at your space, a meticulous inventory, the implementation of smart labeling strategies like the famous “shadow boards,” and the selection of robust and logical storage systems.
But, honestly, the key to it all is adopting that professional mindset: one that values consistency, preventive maintenance, and continuous improvement. That’s what turns a simple workshop into an unstoppable engine of productivity. An organized workspace is a mirror of an organized mind, where time spent searching for things is reduced to zero, accident risks disappear, and the lifespan of your tools is maximized.
Invest the necessary time and effort to apply these ideas. The benefits, in terms of efficiency, safety, money savings, and above all, your personal satisfaction, will be immense and lasting. Your workshop will not just be a place where you make things, but a space that will empower you to do them with the utmost mastery and a pride that will fill your chest.