Build Your Dream DIY Backyard Fire Pit on a Budget
Is there anything more inviting than the gentle dance of flames, the crackling of wood, and the comforting warmth of a fire pit? It’s pure magic, isn’t it? The perfect ambiance for relaxing, unhurried conversations, roasting marshmallows under the stars, or simply enjoying the tranquility of your own garden. A backyard fire pit is a treasure, a space to create unforgettable memories. Perhaps you’ve dreamed of having one, but the idea of building it has held you back, thinking it’s expensive or super complicated. Well, you’re about to discover that it’s not like that at all!
With a little skill, the right planning, and a focus on materials that won’t break the bank, you’ll be able to build a beautiful and super functional fire pit that fits perfectly into your budget and style.
This guide is ready to walk you through every step of this exciting project, from imagining it and choosing your materials to seeing it finished and ready for its first fire. The focus will be on how to save without sacrificing an ounce of safety or durability. Get ready to transform that corner of your patio into your favorite retreat for unforgettable nights. Let’s get started!
I. Planning: The Key to Success!
Before even thinking about moving a single block, planning is THE foundation for a successful project. A fire pit is more than a simple structure; it’s heat and light, and if not handled carefully, it can lead to serious risks. So, pay close attention! Safety, design, and placement are things that need to be carefully considered.
1. Safety First: Never Skip This!
Safety must be your number one priority. Ignoring precautions not only risks your home but also the people you care about.
- Local Regulations and Permits: Check with your local city hall or search online for your municipality’s ordinances. Some cities have rules about fire pit size, distance from other structures, or even require special permits. You don’t want fines or to be forced to dismantle it later.
- Safe Distance: Place your fire pit a good distance from anything that can burn. This includes your house, shed, wooden fences, trees, shrubs, and any dry plants. As a rule, allow at least 3 to 4.5 meters (10 to 15 feet) clear on all sides. Also, consider the prevailing wind direction, as sparks can travel!
- Suitable Surface: Never, under any circumstances, build a fire pit directly on grass, wood, or any combustible surface! The heat from below can ignite it. The ideal base is well-compacted dirt, gravel, sand, or concrete pavers. If you only have grass, you will need to prepare a deep and well-insulated base.
- Fire-Resistant Materials: Use only materials that can withstand heat and fire well. Avoid porous rocks or those collected from a river (which have been submerged in water), because trapped water inside can heat up, expand, and cause the rock to explode, sending dangerous fragments flying. Solid concrete, clay bricks (standard or special refractory bricks), and non-porous natural stones are your best allies.
- Your Safety Kit: Always keep a fire extinguisher, a bucket of sand, and a connected garden hose with good water pressure close at hand when using the fire pit. This will allow you to act quickly if any incident occurs.
- Airflow and Smoke: Think about how air moves in your yard so that smoke doesn’t drift directly into your house or your neighbor’s.
2. Design and Placement: Think Strategically!
The design of your fire pit will not only make it beautiful but also practical and safe.
- Size:
- Diameter: For most homes, an interior diameter of about 60 to 90 cm (24 to 36 inches) is perfect. It’s large enough to burn standard logs without taking up too much space. Consider how many people typically gather around.
- Height: An exterior height of 30 to 45 cm (12 to 18 inches) is comfortable for sitting nearby and safe for containing flames. If it’s too low, sparks could escape; if too high, it might be difficult to manage the fire.
- Shape: Round fire pits are favorites because they are easy to make with landscaping blocks and, who doesn’t love gathering with friends around a fire? Square or rectangular ones also work, but may require more precision when cutting and joining blocks.
- Location and Surroundings:
- Wind: Place it where the wind won’t push smoke towards your house or your neighbors’.
- View: Imagine where you will sit and what you will see. A fire pit can be a beautiful focal point.
- Access: Ensure there is plenty of space to walk, sit comfortably, and have a clear exit if you need to move quickly.
- Drainage: The ground should have good drainage so that water does not accumulate inside the fire pit, which spoils materials and makes lighting the fire difficult!
3. Budget: Keeping Costs in Check!
The main goal of this guide is to help you build a great fire pit without it costing an arm and a leg.
- Landscaping or Retaining Wall Blocks: These are the most economical and easiest-to-use option. You can find them in countless colors and textures at any large DIY store. Sometimes, buying in full pallets makes them even cheaper.
- Bricks: Common building bricks can also work. If you can get recycled bricks in good condition, even better! Just make sure they are fired clay and non-porous.
- River/Field Stones: If you live in an area where you can legally and safely collect large rocks, these can be free! But be careful! Inspect them very well to ensure they are not porous or contain internal moisture, as they could explode. This option requires more caution.
- Steel Fire Pit Ring: Although it adds a bit to the cost, a galvanized steel or thick black steel fire pit ring is a worthwhile investment. It protects the outer blocks from direct heat, making them last longer and enhancing safety by creating a well-defined fire chamber. This allows you to use regular construction adhesive to bond the outer blocks instead of more expensive refractory mortar.
- Gravel and Sand: Economical materials sold in bulk. Ask for deals or look for local suppliers.
- Exterior Construction Adhesive: Essential for bonding your outer blocks if you’re not using mortar. Look for one that withstands weather and temperature changes.
4. Tools Needed: Prepare Your Equipment!
Having the right tools will make everything easier and safer.
- Personal Protection: Work gloves, safety glasses. Non-negotiable!
- For Measuring: Measuring tape, spirit level (a long one is ideal for the base), square.
- For Digging: Shovel, rake.
- For Compacting: Hand tamper or garden roller (for the base).
- For Placing and Adjusting: Rubber mallet (for adjusting blocks), brick chisel and hammer (if you need to cut blocks).
- Other: Wheelbarrow (for moving materials), marker/spray paint (for drawing the circle), string and stake (to help draw a perfect circle).
II. Time to Choose Materials! Your Smart Shopping List
The key to a beautiful, economical, and durable fire pit lies in choosing your materials wisely. Here’s a detailed look at the most accessible options and what to consider.
1. Blocks and Stones: The Heart of Your Structure
These will form the main part of your fire pit’s walls.
- Concrete Landscaping Blocks or Pavers:
- The Good: By far the least expensive and easiest to find option. They come in many shapes (curved, rectangular), sizes, and colors, so you can add your personal touch. Their weight and shape make them very stable. They don’t require mortar if you use a steel ring inside.
- To Consider: Although durable, concrete is not a refractory material. If exposed directly to fire and very high temperatures for too long, it can deteriorate. Therefore, using an inner metal ring is highly recommended to protect them.
- How Many You Need: For a fire pit about 90 cm (36 inches) in exterior diameter and about three layers high, estimate between 12 and 16 blocks per layer, totaling about 36 to 48 blocks, depending on the exact size you choose. Always buy a few extras just in case!
- Common Clay Bricks:
- The Good: Also relatively inexpensive, especially if you find second-hand or leftover bricks from a construction site. They offer a more classic look. They withstand heat quite well, although they are not as “refractory” as special kiln bricks.
- To Consider: Generally require construction mortar to be properly bonded and stable, which adds another step and cost. If used without mortar, you’ll need to stack them with extreme precision, and they would greatly benefit from an inner ring. Make sure they are solid clay bricks, not hollow.
- How Many You Need: For a similar diameter, you’ll need more bricks due to their smaller size, perhaps between 20 and 25 per layer.
- Natural Stones (Field or River):
- The Good: If collected legally, they are free! And they can add a rustic and very natural touch.
- Beware! (This is crucial): This is the riskiest option if not chosen well. **Never use porous stones or stones that have been underwater, because water trapped in their structure can heat up, turn into steam, and cause the stone to violently explode!** Smooth, rounded river stones are often porous and may contain moisture. It’s better to look for dense, non-porous quarry or field rocks that have never been in prolonged contact with water. Granite, lava, or basalt are usually safe, but availability varies. You will need mortar to bond them and ensure structural stability.

2. The Interior: Your Fire Pit’s Shield
This inner layer is crucial for your fire pit’s longevity and safety.
- Steel Fire Pit Ring (Your best budget friend!):
- The Good: Relatively inexpensive and easy to install. It acts as an effective shield between the fire and your exterior concrete blocks, protecting them from direct heat and allowing you to use regular landscaping adhesive. It simplifies construction by not requiring refractory mortar.
- To Consider: Make sure it’s thick gauge steel (10 or 12 gauge is good) and has a heat-resistant coating, or is made of black steel which will develop a nice patina with use. They come in standard diameters, which will help you decide the inner size of your fire pit.
- Refractory Bricks (More expensive, but top-notch for heat):
- The Good: Specifically designed to withstand extremely high temperatures, they are the most durable for the combustion chamber.
- To Consider: They are considerably more expensive than common bricks or steel rings. And to bond them, you need refractory mortar, which further increases cost and difficulty. They are not the best option for a “budget-friendly” project.
3. The Silent Foundation: Base and Fill
These materials provide stability, good drainage, and leveling.
- Gravel (20-40mm or similar):
- Purpose: Creates a firm, well-draining base. Prevents moisture from accumulating under the fire pit and provides a stable surface for setting blocks.
- How Much You Need: Enough for a 10-15 cm (4-6 inches) deep layer in your fire pit area.
- Leveling Sand (Play sand or mason’s sand):
- Purpose: Goes on top of the gravel to create a perfectly level surface before laying the first row of blocks. Fills small gaps and allows for fine adjustments.
- How Much You Need: About 2.5-5 cm (1-2 inches) is usually sufficient.
- Exterior Construction Adhesive (A great ally for bonding blocks!):
- Purpose: If using concrete blocks and an inner ring, this adhesive is an inexpensive and effective way to bond the outer block layers, providing long-term stability against movement and weather. Look for one that is weather-resistant and designed for outdoor use.
- To Consider: It is not refractory! So, never use it where it will directly touch flames or intense heat. This is why the inner ring is VITAL.
4. Extras for the Finishing Touch (Optional, but worthwhile):
- Cooking Grate: A swivel or fixed grate can turn your fire pit into a barbecue.
- Fire Pit Cover: Protects the interior from rain and debris when not in use, and provides extra security.
- Decorative Stones/Fine Gravel: For the ground around the fire pit or to fill gaps between the inner ring and outer blocks.
III. Let’s Get to Work: Your Fire Pit, A Reality!
With planning complete and materials on hand, it’s time to roll up your sleeves! Follow these steps to build your budget-friendly fire pit.
Step 1: Prepare and Mark the Ground
This step is crucial for ensuring your fire pit is in the perfect spot and well-leveled from the start.
- 1.1 Clear the Area: Remove any plants, rocks, debris, or roots where you plan to build the fire pit. The area should be completely clean and clear. Remember those 3-4.5 meters (10-15 feet) of safety distance from anything combustible!
- 1.2 Draw the Circle (or Square):
- For a circle: Drive a stake exactly in the center where your fire pit will go. Tie a string to the stake and, at the other end, attach a pencil or stick at the measure of the exterior radius you want for your fire pit (for example, if the exterior diameter is 90 cm (36 inches), the radius will be 45 cm (18 inches)). Keep the string taut and draw a circle on the ground. You can use spray paint for a more lasting mark.
- For a square: Use a measuring tape and a square to mark the sides of your square or rectangle.
- 1.3 Dig the Base:
- Dig within the marked circle. The depth will depend on your design and the terrain. About 15-20 cm (6-8 inches) is usually enough for a gravel and sand base, plus the first layer of blocks partially buried for added stability.
- Ensure the bottom of the excavation is as level as possible with your shovel. An uneven ground here will make your life difficult later.
Step 2: Create a Strong, Well-Draining Base
A well-made base is essential for your fire pit to be stable and last for years.
- 2.1 Spread the Gravel: Pour a 10-15 cm (4-6 inches) layer of coarse gravel into the excavated area. Spread it evenly.
- 2.2 Compact the Gravel: Use a hand tamper or garden roller to thoroughly compact the gravel. This is key to prevent the ground from sinking later and destabilizing your structure. You can slightly dampen the gravel before compacting for a better result. Pass the tamper several times in all directions.
- 2.3 Add the Sand Layer: Once the gravel is compacted, spread a 2.5-5 cm (1-2 inches) layer of leveling sand over the gravel.
- 2.4 Level the Sand: Using a straight board (a piece of wood or metal) and your spirit level, drag the sand to create a perfectly flat and level surface. Make sure there are no slopes, because any unevenness here will become enormous when you stack the blocks! Take your time with this step, it is crucial.
Step 3: Place the Inner Steel Ring (If Using)
This step is only if you opted for the steel ring, which provides extra protection.
- 3.1 Place the Ring: Center the steel fire pit ring on the leveled sand base.
- 3.2 Check for Level: Use the spirit level to ensure the ring is perfectly horizontal in all directions. If necessary, remove or add a little sand underneath to correct any unevenness. A level ring will make building the outer walls much easier!
Step 4: Build the Exterior Walls
This is where things get interesting, and your fire pit begins to take shape! This process is similar whether you use landscaping blocks or bricks.
- 4.1 The First Layer of Blocks/Stones:
- Around the ring (if using): Begin by placing the first layer of concrete blocks or bricks around the inner steel ring. Leave a small gap (approximately 1-2 cm / 0.5-0.75 inch) between the ring and the outer blocks to allow for expansion and air circulation.
- Without a ring: If not using a ring, place the first layer directly on the leveled sand base. Ensure the inner diameter of this first layer is what you want for your fire pit.
- Level each one: As you place each block, check that it is individually level with a small level. Use the rubber mallet to gently tap and adjust if needed.
- Fit them well: Make sure each block is well-seated and touching the previous one. If using curved blocks, it will be easier. If using rectangular blocks for a circle, you’ll have to leave small wedge-shaped gaps between them, or simply accept a more rustic look with these small openings.
- 4.2 Stack More Layers:
- Stagger the Joints: For maximum stability and strength, the upper layers should “straddle” the joints of the lower layers. This means that half of an upper block should rest over the joint of two lower blocks, just like traditional brick walls. This distributes weight and prevents the wall from collapsing.
- Apply adhesive (highly recommended for Landscaping Blocks!): If you use concrete blocks and an inner steel ring (which prevents the outer blocks from being exposed to extreme heat), apply a good bead of exterior construction adhesive on top of each block of the lower layer before placing the next. This will bond the blocks together permanently and make your fire pit super robust. Be sure to follow the adhesive manufacturer’s instructions regarding how much to apply and how long to let it cure.
- Constantly check: As you add each layer, use your spirit level to ensure the layer is horizontal and the wall is straight (verticality). Small deviations in the lower layers become much larger at the top. Correct any tilt immediately.
- Height: Continue stacking layers until you reach your desired height, which is usually 30 to 45 cm (12 to 18 inches), meaning 2 or 3 layers of standard landscaping blocks.
- 4.3 Fill the Outer Space (If using a Steel Ring):
- If there’s a gap between the steel ring and the outer blocks, you can fill it with sand, fine gravel, or small decorative stones once the exterior walls are complete and the adhesive (if used) has cured. This helps stabilize the ring and creates a neater finish.
Step 5: Finishing Touches and Curing!
We’re almost ready to light the first flame! But we still have a couple of important things left to do.
- 5.1 Clean Up: Remove any construction debris, dirt, or leftover adhesive.
- 5.2 Curing Time: If you used exterior adhesive to bond the blocks, it is **CRUCIAL** to let it dry and cure completely for the time indicated by the manufacturer before lighting a fire. Skipping this step can weaken the bonds. This can range from 24 hours to several days, depending on the product and weather.
- 5.3 Final Inspection: Once everything is dry and cured, perform a final inspection. Ensure the structure is stable, that there are no loose blocks, and that the surrounding area is clear of any flammable materials.
A Note: If you don’t use the steel ring (more complicated and potentially more expensive!)
If you decide not to use a steel ring (for example, if you use refractory bricks or rely heavily on the resistance of your exterior materials), the construction of the inner walls becomes more critical:
- Refractory Mortar: You will need to use refractory mortar to bond the layers of bricks that will be in direct contact with the fire. This mortar is more expensive and harder to work with than common mortar.
- Expansion Gaps: You will need to leave small joints or expansion gaps between the inner bricks or blocks so that the material can expand and contract with heat and cold without cracking. This is a more advanced design.
- Heat-Resistant Material: If you don’t use refractory bricks, the material of the outer wall must be inherently very heat-resistant (like certain dense stones) or it will degrade over time. Standard concrete is not designed for direct contact with flames.
For an economical and easy option, using landscaping blocks with an inner steel ring is, without a doubt, the best approach.
IV. Enjoy It Safely: Your Fire Pit, Always Ready!
Once your fire pit is ready, enjoying it safely depends on how you use and care for it.
1. The First Fire: Cure Patiently and Observe
- Adhesive/Mortar Curing: Make sure any adhesive or mortar you used is completely cured before lighting the first fire. If you skip this step, the bonds can weaken.
- The first fire, take it slow: For the first time, it’s best to light a small, controlled fire. This allows the materials (especially if you used refractory mortar or cement) to “cure” or settle gradually with the heat. Observe how your structure reacts and if you see anything unusual (cracks, instability).
2. Safe Use of Your Fire Pit: Golden Rules You Cannot Forget!
Safety is something you should never relax about. It’s your responsibility to ensure everything is safe.
- Never leave it unattended!: Under no circumstances leave a lit fire pit unsupervised, not even for a second. A sudden shift in wind or a rogue spark can cause a fire in the blink of an eye.
- Keep your extinguishing equipment handy: Always have a fire extinguisher, a large bucket of sand, and a connected garden hose with good water pressure visible and within reach. They will be your best friends if something goes wrong.
- Don’t overdo the firewood: Avoid piling too much wood. A fire that is too large can spill out of the fire pit, release many sparks, and be difficult to control. Keep flames within the inner ring (if you have one) or within the height of the walls.
- Firewood: choose wisely!: Use only dry, well-seasoned firewood. Green or damp wood produces a lot of smoke, crackles excessively, and doesn’t burn well. Never burn trash, plastic, chemically treated wood (like from pallets or construction), freshly cut branches, or anything that could release toxic gases or explode!
- Keep the area clear: The immediate area around the fire pit must be free of dry leaves, branches, garden furniture, toys, clothes, or any other flammable materials. Consider having a “safety zone” of at least 1 meter (3 feet) radius around the fire pit that is completely clear of combustibles.
- Explain clear rules: If children or guests are present, explain the fire pit safety rules to them. Designate a responsible adult “fire guardian.”
- When finished, extinguish thoroughly!: Before going to bed or leaving the area, make sure the fire is completely out. Spray ashes and embers with plenty of water, stir them with a shovel or poker, and spray again. Repeat until there is no smoke or heat. Embers can remain hot for hours.
3. Regular Maintenance: To Make It Last a Long Time!
A little maintenance can greatly extend the life of your fire pit.
- A little cleaning: Once the fire is completely out and cold (this can take several hours), remove the ashes. A thin layer of ash at the bottom is fine and can help insulate, but too much ash will reduce airflow and prevent the fire from burning as well. Ashes can be an excellent garden fertilizer (after cooling completely).
- Keep an eye on it from time to time: Regularly inspect your fire pit for cracks in the blocks, structural shifts, or deterioration of the steel ring. Small problems can be fixed before they turn into major repairs. If you see a loose block, re-glue it with exterior adhesive.
- A shield for bad weather: If you live in an area with a lot of rain or snow, consider buying a cover for your fire pit. It will protect the interior from water accumulation, which can make lighting difficult and promote mold, as well as protecting the materials.
4. Winter Tips: Don’t Let the Cold Ruin It!
- Good drainage: Ensure proper drainage around and within the fire pit. Freeze-thaw cycles can be especially damaging to concrete blocks if water accumulates and freezes inside.
- Cover: A cover is especially useful in winter to prevent snow and ice from accumulating inside the fire pit.
V. Your Personal Touch: Make It Unique with Future Upgrades!
Once your basic fire pit is built and functional, there are many ways to customize and improve it over time, almost always following the same “without spending much” idea.
1. Make It Even More Beautiful: That Magical Touch
- A sitting area: Surround your fire pit with comfortable, durable seating. These could be sanded and sealed logs, wooden benches you build yourself, or fire-resistant garden chairs. With additional concrete blocks, you can build low walls that serve as bases for benches.
- Decorative stones: Fill the area around the fire pit with decorative gravel, river pebbles (make sure they are quarry stones and non-porous!), or crushed rock to create an attractive and clean “floor” that also serves as an extra layer of safety against sparks.
- Ambient lighting: Install solar or low-voltage lights around the perimeter of the fire pit area to create a cozy atmosphere and increase safety after dark. LED string lights also add a festive touch.
- An elegant stone “hat”: If your budget allows in the future, you can add an upper layer of flat, polished natural stone (like granite or flagstone) over the landscaping blocks. This creates a smooth, elegant surface for placing drinks or resting feet, and greatly improves aesthetics.
- Integrated planter: If you have more space, you can design a set that includes small planters with fire-resistant plants around the fire pit area for a touch of greenery.
2. Make It More Practical and Comfortable: Maximum Functionality!
- Time to cook over the embers!: A stainless steel or cast iron grate, either fixed or rotating, can transform your fire pit into an outdoor cooking center. Look for models that can be adjusted in height to control heat intensity.
- A spot for firewood: Build a simple woodshed near the fire pit. It can be a simple structure of concrete blocks and wood, or even a neat stack covered with a tarp. Keeping firewood dry is crucial for an efficient fire with less smoke!
- Fire pit cover: A metal or mesh cover protects the interior from rain, dirt, and leaves when the fire pit is not in use. It can also serve as an additional safety measure to prevent children or pets from falling in, or to help extinguish a stubborn fire (although you should always have water and sand handy).
- If you notice the fire struggling to breathe: If you find your fire has difficulty starting or smothers easily, it may need better ventilation. Some block fire pit designs incorporate small strategic holes or gaps in the lower layer to allow additional air intake, promoting more efficient combustion. This can be done by leaving small gaps between some blocks or drilling holes if the blocks are solid and suitable for it.
- Ash management: For easier cleaning, some people install a raised metal mesh base inside the inner ring, allowing ashes to fall into a pit below. This is more complex and generally seen in more elaborate fire pit designs, but it is a possibility for the future.
3. Think Big: The Complete Space
Think of your fire pit as the center of a larger outdoor space:
- Access path: Create a paver or gravel path leading to the fire pit, defining the space and making it more accessible.
- Entertainment zone: Design a complete outdoor entertainment area that incorporates the fire pit, perhaps with a small side table for drinks or board games.
The key is to start with something solid and economical, and then, when you feel like it and your budget allows, add those details that will make it unique and completely yours.
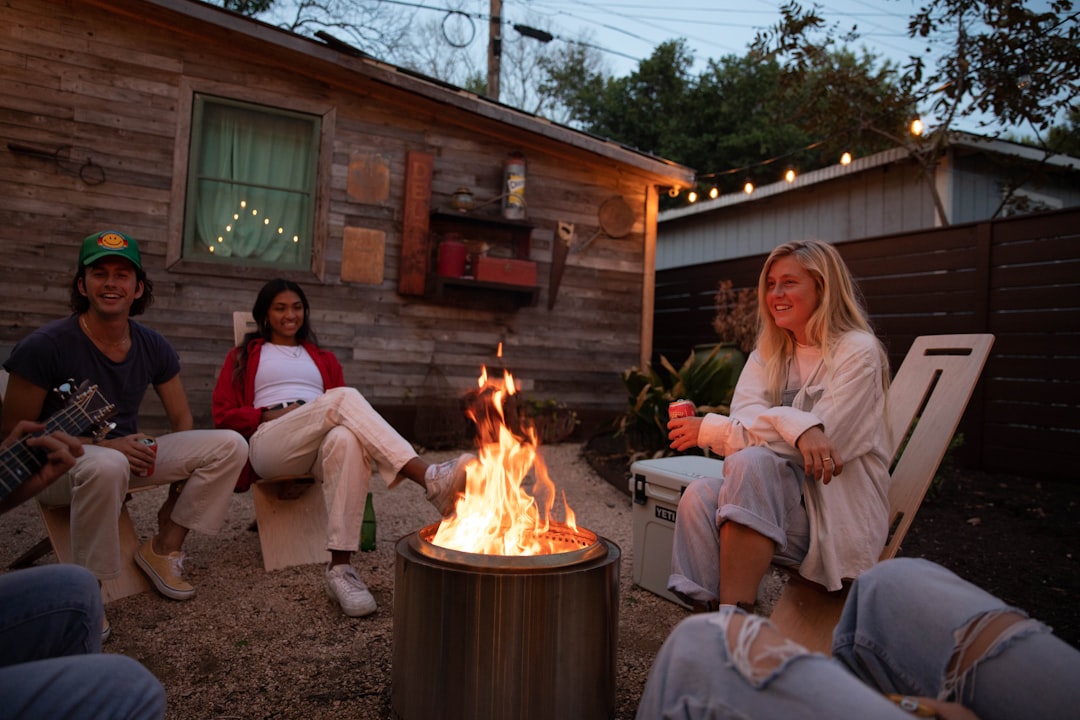
VI. The Best Reward: Your Own Fire Pit!
Building your own fire pit with budget-friendly materials is an incredibly rewarding project that combines utility with the joy of creating a space for enjoyment and relaxation. By following this step-by-step guide, you will have not only created a functional and safe structure but also invested your time and care into a DIY project that will bring you many hours of pure joy. There’s nothing like the satisfaction of sitting by that fire that YOU created, knowing you achieved an amazing result without spending a fortune. It’s a unique feeling!
From careful safety planning to intelligent material selection, through detailed construction and a commitment to maintenance, each stage contributes to your fire pit’s longevity and resounding success. Now, with your new backyard gem ready and safe, it’s time to light the first flame. Invite your friends and family, prepare marshmallows, share stories, and create unforgettable memories under the starry sky. Your fire pit is not just a structure of stone and fire; it’s your gathering point, your personal refuge, and proof of your ingenuity and dedication. Now, go and enjoy it to the fullest!