Create Your Own Corner of Magic and Order! Your Ultimate Guide to a DIY Storage Bench with Hidden Compartments and Extra Seating
Introduction: Where Style Meets Real Life in Your Home
Have you ever felt like your home is missing that special something? That piece of furniture that not only looks incredible but also cleverly solves your space problems? Welcome to the club! In today’s world, where every square meter counts, finding smart solutions that combine beauty and functionality is like discovering a treasure. And believe me, a bench with hidden storage is that treasure you’ve been searching for.
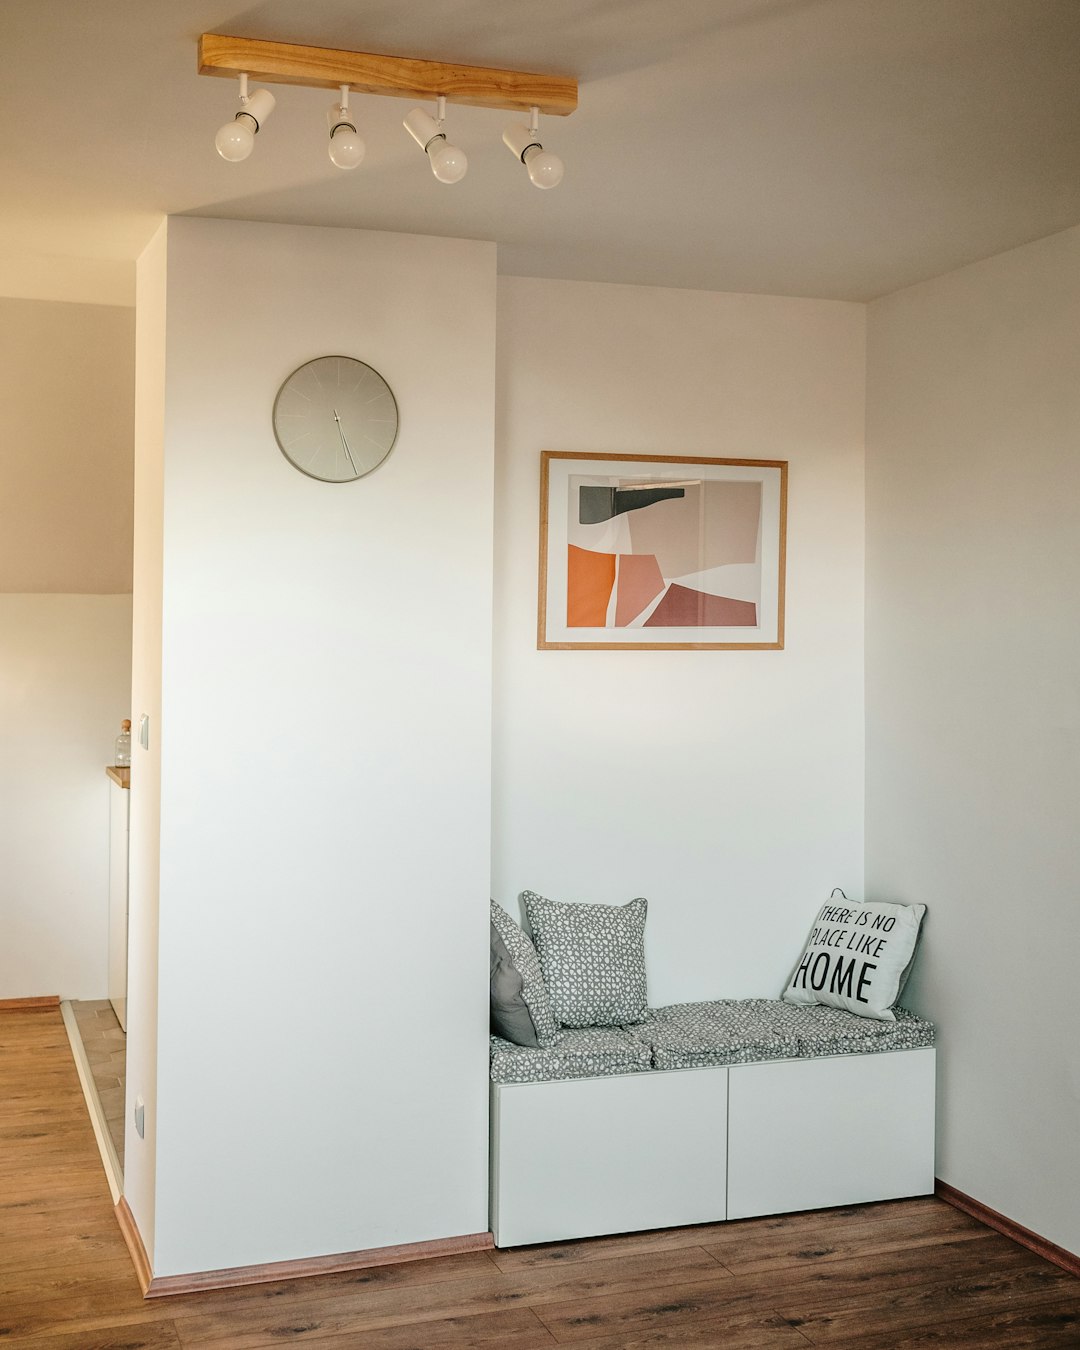
Imagine: suddenly, you have extra seating for those impromptu gatherings, and at the same time, a secret place to stash away daily clutter. It’s the perfect hideaway for shoes accumulating at the entrance, cozy blankets in the living room, toys invading the kids’ room, or even those garden tools you never know where to put. This piece of furniture isn’t just a bench; it’s a breath of fresh air, a silent organizer, a faithful friend to your home.
But the best part is this: you’re going to build it with your own hands! This means you can design it exactly to your taste, with perfect dimensions, the style you love, and the finish that will make your heart beat faster. It’s a project that will fill you with pride, a DIY experience accessible to any enthusiast eager to create. This guide isn’t just a manual; it’s your companion, your accomplice every step of the way, from that initial spark of an idea to the final touches that will make your bench a robust, beautiful, and above all, incredibly functional piece. Get ready not just to build furniture, but to transform the comfort and organization of your own personal sanctuary.
1. Planning and Design: The Heart of Your Project
Before the first splinter flies, take a moment to dream. The planning phase is like your treasure map: if you draw it well, you’ll save yourself headaches and enjoy the journey much more.
1.1. Your Vision: Where and What Do You Need It For?
Imagine your bench in its place. What role will it play in your daily life?
- Its Home: Will it be the star of the entryway, waiting for your shoes and keys? The silent companion in your living room, ready to store blankets and books? Perhaps a cozy seat in the dining room, or a guardian of toys in the bedroom? Or even on your covered porch, protecting cushions or tools?
- Its Purpose: Will it witness many sittings, or rather be the guardian of objects? This will give you clues about how robust it should be and what finish will protect it best.
- How Often Will It Open?: If its lid will be in constant motion, think about hinges that can keep up with the rhythm of your life.
1.2. The Perfect Measurements for Your Life
Dimensions are not just numbers; they are the key to your bench’s comfort and practicality.
- The Right Height: For it to be a true seat, aim for a height of 45 to 50 cm. Want a plush cushion? Remember to subtract its thickness so the structure has the ideal height.
- Cozy Depth: Between 38 and 50 cm is perfect for sitting. If storage is your priority, you can make it deeper, but always thinking about your back.
- The Ideal Length: How many smiles do you want to seat? A 120 cm bench is perfect for two, while a 180 cm one accommodates three or four. Make sure the lid has space to open and reveal its secrets!
- Interior Space: What treasures will you store? If they are bulky blankets, you’ll need more height. If they are small items, you might want to add dividers to keep everything in its place.
1.3. Your Style, Your Essence
Your bench is not just an object; it’s an extension of you and your home.
- The Vibe: Modern, rustic, classic, minimalist? Choose a style that blends with your decor. This will guide every decision, from the wood to the last latch.
- The Bench’s Skin: Solid wood that breathes nature, elegant plywood, or MDF ready for a vibrant color? Each material has its own charm.
1.4. Sketches and Plans: Your Vision on Paper
Don’t underestimate the power of a good drawing. It’s the first step to seeing your dream come true.
- Initial Scribbles: Let your imagination soar. Draw, erase, play with shapes.
- The Final Design: Once you have your idea clear, get to the blueprints! With all precise measurements, front, side, and top views.
- Important Details: Indicate how you will join the pieces, where the hinges will go, the internal reinforcements. This is crucial for your shopping list to be perfect.
- The Cut List: From your plans will emerge the magical list of all the pieces you need, with their exact measurements.
1.5. The Soul of Your Bench: Wood Selection
The wood you choose defines not only its beauty but also its strength and personality.
- Solid Wood: Pine (budget-friendly, easy to work with, beautiful when stained), oak (a champion in durability and beauty, more exclusive), maple or birch (hard, perfect for painting), poplar (light, ideal for a flawless finish). Ideal if you’re looking for a natural or stained look.
- Plywood: Your best ally for large surfaces (sides, base, lid). Look for quality (Baltic birch or good-finish pine) to avoid surprises and achieve a smooth result. Its veneers are a delight to sand and stain.
- MDF (Medium-Density Fiberboard): Budget-friendly, super stable, and the perfect canvas for paint. Keep in mind it’s heavy and doesn’t like moisture much.
- The Winning Combination: Many choose plywood for panels and solid wood for frames and details, the perfect fusion!
2. Essential Tools: Your Allies in This Adventure
Having the right tools is like having superpowers: they make the job easier, safer, and most importantly, with professional results!
2.1. Precision in Your Hands: Measuring and Marking
In carpentry, precision is your best friend.
- Tape Measure: Your magic wand for all measurements.
- Carpenter’s Square: To ensure everything is in place, with perfect angles.
- Carpenter’s Pencil: Your silent companion for marking every cut and joint.
- Long Metal Ruler: To draw straight lines like the horizon.
- Depth Gauge: For those details that make a difference.
2.2. Cuts with Magic: Your Saws
Clean and accurate cuts are the foundation of a perfect bench.
- Circular Saw: Your hero for those straight, long cuts in panels. Don’t forget a straight edge guide for impeccable results!
- Jigsaw: For those curved touches or delicate adjustments.
- Table Saw: If you’re an experienced adventurer, this is a gem for precise and repetitive cuts. But always with respect and caution!
- Miter Saw: For perfect angles on legs and moldings.
2.3. Strong Joints: Your Assembly Companions
So your bench is as solid as your dreams.
- Cordless Drill/Driver: Your right hand for drilling and screwing non-stop. A lithium battery will be your best friend.
- Drill Bits: In all sizes, for every pilot hole and countersink.
- Clamps (Carpenter’s Clamps): Don’t underestimate their power! They are essential for holding pieces together and ensuring everything fits perfectly.
- Hammer: For those small adjustment taps.
- Kreg Jig (or similar): Your secret to invisible and super strong joints.
- Upholstery Stapler: If your bench will have a magazine-worthy cushion.
2.4. The Finishing Touch: Finishing Tools
So your bench looks like it just came out of a luxury workshop.
- Orbital or Belt Sander: To make your surfaces silky smooth.
- Sanding Blocks: For details and corners.
- Hand Plane: For those fine adjustments that seek perfection.
2.5. Your Protective Shield: Personal Safety Equipment
Your safety is the most important thing! Never, EVER forget it.
- Safety Glasses: Your eyes are treasures, protect them from any splinters.
- Hearing Protection: Your ears will thank you when using noisy tools.
- Work Gloves: To protect your hands from splinters and cuts.
- Respirator Mask: Essential when sanding, especially MDF.

3. Required Materials: The List to Make Your Dream Come True
With your vision clear and your plans in hand, it’s time to go shopping and choose the materials that will bring your bench to life.
3.1. Wood and Panels: The Structure of Your Work
- Birch or Pine Plywood (18-20 mm thick): This will be the skin of your bench: sides, front, back, base, and lid. The quantity will depend on the size you’ve dreamed of.
- Solid Wood Strips (2×2 or 2×4 cm): For those internal reinforcements that will give your bench extra strength.
- Solid Wood Boards (optional): If your heart beats for a bench entirely made of natural wood, these are your allies!
3.2. Hardware: The Details That Join and Function
- Wood Screws: Of various lengths, for each joint. Look for countersunk head screws for a flawless finish!
- Wood Glue (PVA): Your secret to indestructible joints.
- Hinges:
- Piano Hinge (Continuous): Perfect for long lids, it distributes weight elegantly.
- Soft-Close Hinges: Indispensable if there are children in the house! They prevent the lid from slamming shut.
- Gas Struts: So the lid opens with a touch and stays up effortlessly. A luxury!
- Latches or Catches (Optional): If you want to add a touch of mystery or extra security.
3.3. Finishing Materials: The Final Beauty
This is the moment for your bench to shine with its own light.
- Sandpaper: Sheets or discs of different grits: for rough sanding, for preparation, and for the final touch of smoothness.
- Wood Putty: Your ally for hiding imperfections and holes.
- Primer: If you’re going to paint, it’s the secret to a uniform and durable color.
- Paint: Choose the color that speaks to you, that matches your style, and that is durable!
- Varnish or Polyurethane: The protective shield for your wood, glossy, satin, or matte, you choose!
- Wood Stain: To enhance the natural beauty of the wood and give it a new tone.
- Wood Oil: For a warm, natural finish that nourishes the wood from within.
3.4. Upholstery Materials (Optional for a Dream Cushion)
- High-Density Foam: The soul of your cushion, cut to the exact size of your lid.
- Batting: To give your cushion that softness and plush look that invites sitting.
- Upholstery Fabric: Choose a fabric you love, resistant, and with a pattern that screams “this is me!”.
- Spray Adhesive: To secure the batting to the foam.
- Upholstery Staples: Your allies to keep everything in place.
4. Step-by-Step Construction Process: Your Vision Comes to Life!
Now that you have everything ready, it’s time for the magic to begin. Patience and precision will be your best virtues!
Step 1: Precision Cuts: Every Piece Counts
Every cut is a step towards your masterpiece. Precision here will prevent headaches later.
- Mark with Care: With your tape measure and square, mark each piece on the wood. Double-check before cutting!
- Safe Cuts: Safety glasses and hearing protection on!
- For large panels, your circular saw with a guide is your best friend.
- For small pieces, the miter saw or jigsaw will do the job.
- Pieces You’ll Need (example for a 120x45x45 cm bench):
- Side Panels (2): 45 cm (height) x 43.2 cm (depth).
- Front Panel (1): 120 cm (length) x 45 cm (height).
- Back Panel (1): 120 cm (length) x 45 cm (height).
- Internal Base (1): 116.4 cm (length) x 43.2 cm (depth).
- Lid (1): 120 cm (length) x 45 cm (depth).
- Base Support Strips (2): 116.4 cm (length) x 4 cm x 2 cm.
- Hinge Support Strips (2): 116.4 cm (length) x 4 cm x 2 cm.
Step 2: The Body of Your Bench: It Takes Shape!
This is where your vision begins to materialize in three dimensions.
- Join with Strength and Love:
- Apply glue generously to the edges.
- Place the front panel between the two side panels. Use clamps to hold everything tightly!
- Drill pilot holes; this is key to prevent the wood from splitting!
- Screw with passion. If you use Kreg, your joints will be invisible and perfect.
- Repeat with the back panel, and voilà, your rectangular box comes to life!
- Check for Squareness: Measure the diagonals. If they are identical, congratulations, your bench is perfect and stable!
Step 3: The Secret Base: The Heart of Your Storage
This base will support all your hidden treasures.
- Support Strips: Cut and attach two wood strips along the inside of your bench.
- The Ideal Height: Decide at what height you want your base to be. Mark it on the inside. About 2-3 cm from the bottom edge is usually ideal.
- Secure the Base: Place the base panel on the strips. Drill and screw it with confidence. This will give it incredible strength.
Step 4: The Lid: Your Seat and Your Best-Kept Secret
The lid is the crowning jewel of your bench.
- Cut the Lid: Cut the panel to the exact dimensions of the top of your bench.
- Reinforce (Recommended!): If your lid is long or will bear a lot of weight, add some strips on the inside. More strength, more durability!
- Sweet Edges: Leave the edges straight, round them, or bevel them. This is not only aesthetic, but also more comfortable!
Step 5: The Hinges: The Soul of Smooth Movement
The choice and installation of hinges are crucial for the impeccable functioning of your lid.
- Perfect Position:
- If using piano hinges, align one side to the bench body and the other to the lid, ensuring everything fits perfectly!
- If using individual hinges, distribute them about 10-15 cm from the ends and one in the center.
- Mark and Drill: Mark the screw points and drill shallow pilot holes.
- Secure Firmly: Screw the hinges first to the body and then to the lid. Open and close several times to ensure everything flows.
- Lid Supports (Safety First!): If using gas struts or soft-close mechanisms, follow their instructions. They are vital to prevent sudden closures, especially if children are nearby!
Step 6: Organize Your World: Reinforcements and Divisions (Optional)
If you want the inside of your bench to be as organized as your mind, this is your moment!
- Internal Divisions: Cut plywood pieces to create custom compartments.
- Extra Reinforcements: If your bench will be the superhero of your home, add vertical supports for epic resistance.
Step 7: Details That Charm: Structure and Aesthetics
The small touches are what turn a piece of furniture into a work of art.
- Legs with Personality (Optional): If you want to elevate your bench, add decorative legs that match your style.
- Moldings That Tell Stories: Moldings can completely transform the look of your bench, giving it a classic or modern touch.
- First Sanding: Before any finish, sand all surfaces. It’s the secret to a smooth and professional finish.
5. Finishing and Personalization: Your Bench, Your Signature!
This is the moment to breathe life into it, to give it your personal stamp, and to watch your project become a piece of art.
5.1. The Art of Sanding: The Final Caress
Good sanding is the basis of a finish you’ll fall in love with.
- Progression with Love: Start with a medium grit for imperfections, then a finer one for that unmatched smoothness. Always sand along the wood grain.
- Detailed Corners: Use sanding blocks for every corner and edge.
- Goodbye Dust!: Vacuum and wipe away every trace of dust with a damp cloth. We don’t want intruders in our finish!
5.2. Little Secrets: Putty and Touch-ups
- Fill with Magic: Fill screw holes or any small cracks with wood putty. Let it dry.
- Sand to Perfection: Once dry, sand the putty flush.
5.3. Your Style Statement: Applying the Finish
Your choice of finish is your personal signature, your style statement.
- Primer (if painting): An even coat to seal the wood and prepare the canvas for color.
- Paint: Two or three thin coats, lightly sanding between them for a dreamy surface.
- Wood Stain: If you want the wood grain to sing, apply a stain with a rag or brush.
- Varnish or Polyurethane: The protective embrace for your wood, with 2-3 coats for durability that withstands the test of time.
- Wood Oil: For a natural and warm look that nourishes the wood from its soul.
5.4. The Soft Embrace: Cushion Upholstery (Optional)
A plush cushion is the final touch of comfort and style.
- Custom Foam: Cut the foam to the exact size of your lid.
- Batting for Softness: Wrap the foam with batting for that plush, cozy look.
- Fabric That Charms: Cut the fabric with a good margin.
- Staple with Confidence: Center the fabric, stretch it to be perfect, and staple it to the underside of the lid. Pay attention to the corners for a flawless finish!
5.5. The Final Details That Shout “It’s Mine!”
- Handles or Pulls: If you want easier access and an elegant touch.
- Decorative Legs: If you didn’t put them on before, now is the time to give your bench that final touch.
6. Maintenance and Care: So Your Treasure Lasts Forever
Your bench is a special creation, and a little care will keep it young and vibrant for many years.
- Gentle Cleaning: A damp cloth is all you need. Avoid harsh products!
- Check the Details: From time to time, tighten screws and hinges. Small adjustments make a big difference.
- Touch-ups with Love: If the finish scratches, sand gently and apply a new coat.
- Outdoor Protection: If your bench lives outdoors (covered), make sure its finish protects it from sun and moisture.
- Pampered Cushion: Clean stains on your cushion according to the fabric instructions. Some have washable covers!
7. Safety Considerations: Your Well-being Comes First
From the first cut to the last coffee on your new bench, your safety and that of your loved ones is the number one priority.
7.1. Hands-On with Common Sense
- Your Protective Shield: Always wear safety glasses, hearing protection, and gloves!
- Tools with Respect: Read the manuals. Never remove guards. Keep your hands away from blades!
- Clean Space: Keep your work area tidy. A stumble can ruin the day!
- Hold Firmly: Use clamps to secure pieces. Your hands are not a vise!
7.2. Enjoy Your Bench Safely
- Stability is Key: Make sure your bench doesn’t wobble. If necessary, use pads on the legs.
- Safety Hinges: If children are nearby, soft-close hinges or gas struts are a lifesaver to protect little fingers.
- Don’t Overload It: Your bench is strong, but it has its limits. Respect its weight capacity.
- A Little Air: If storing textiles or delicate items, ensure it has some ventilation to prevent moisture.
Conclusion: Your Space, Your Creation, Your Pride
Congratulations, creator! You’ve reached the end of this incredible adventure. You haven’t just built a bench with hidden storage; you’ve invested your time, ingenuity, and passion into creating a piece that will transform the functionality and beauty of your home.
This bench isn’t just wood and screws; it’s a reflection of your skill, your creativity, and your desire to make your home more uniquely yours. Enjoy the extra comfort, the organization you always dreamed of, and above all, the immense satisfaction of having created something so meaningful with your own hands. Now, grab your tools, refer back to these steps if you need to, and get ready to delight in this piece of carpentry that is as functional as it is beautiful. Your home and you deserve this touch of magic!