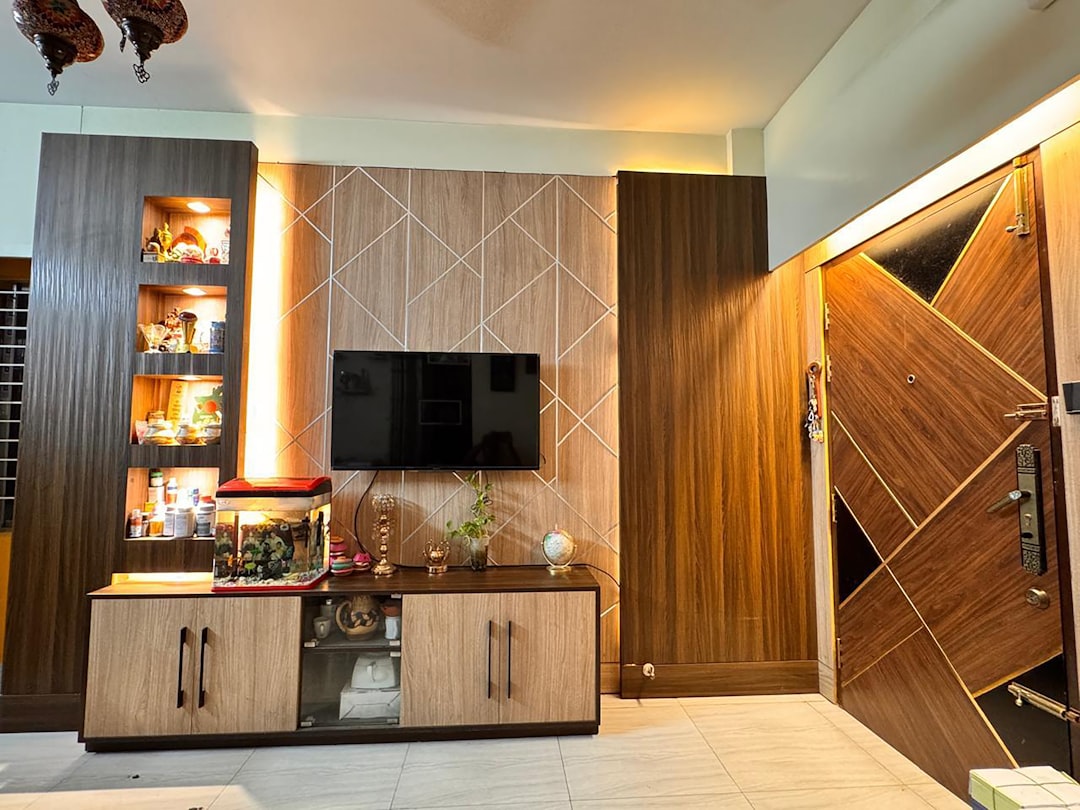
Your Magazine-Worthy Living Room: How to Create That Dream Wooden Wall with Your Own Hands
Your living room! That special corner where life happens, where laughter echoes, and important moments are woven. Wouldn’t it be incredible to give it a radical twist, a touch that speaks of you and your home, radiating warmth and sophistication? Well, get ready, because adding a decorative wooden wall is like giving your space a giant hug, transforming it from ordinary to extraordinary, with a character that screams “home!”
Beyond being a magazine trend, a wooden wall is an investment in the soul of your house, a style statement that will fill you with pride every time you look at it. Are you up for creating something durable and beautiful with your own hands? Then you’re in the right place! This guide will lead you through every stage of this DIY adventure, from the first spark of an idea to the final touch, ensuring your project is a resounding success and a source of satisfaction.
Chapter 1: Dreaming and Designing Your Perfect Wall (No Nailing Just Yet!)
Before you get excited and nail the first board, let’s make a plan! A well-thought-out accent wall not only complements what you already have but becomes that star that defines the style of your living room. It’s like being your own interior designer for a day.
1. Choosing the Right “Canvas”: Which Wall Will Be the Lucky One?
Not all walls are destined to be the protagonist. Consider this:
- The Main Wall: Which one is most visible when you enter? Where is the TV or fireplace? That’s usually the ideal candidate to steal all glances.
- Balance and Harmony: Ensure your wooden wall doesn’t visually overpower the room. If your living room is small, perhaps a very busy pattern might make it feel even more cramped. Look for that sweet spot.
- The Dance of Light: Light is your best friend (or your worst enemy if you don’t consider it)! Observe how the sun hits your wall throughout the day. Will it create interesting shadows that highlight the wood’s texture? Or perhaps you’ll need a little accent lighting to make it shine at night?
- Obstacles in Sight: Windows, doors, switches, outlets… Real life! Take them into account from the beginning so your design integrates them naturally, not as a headache.
2. The Soul of Your Wall: Wood Type and Finish
This is where your personality comes into play. The wood you choose and how you treat it will be the soul of your wall.
- Reclaimed Wood: Imagine boards with stories to tell! They bring an unparalleled rustic charm; each piece is unique, with imperfections that make it authentic. Perfect for a rustic, industrial, or bohemian style. Just make sure it’s clean and ready for its new life.
- Shiplap Boards: A timeless classic. Its clean, linear aesthetic, whether horizontal or vertical, creates subtle grooves that are super versatile for modern, coastal, or elegantly rustic looks. They come ready to use or for you to add your touch of paint.
- Plywood or MDF Panels: Your allies if you’re looking for something more economical or a super smooth surface for painting. You can cut them into strips and create incredible geometric patterns.
- Wood Slats: Do you want a 3D effect that screams “modern design”? Slats are your option. With spaces between them, often over a dark background for that dramatic contrast, they are pure minimalist trend.
- Rough Sawn Wood: If you’re looking for a more organic texture, one that feels alive, this is for you. Less polished, more natural.
- Finishes to Fall in Love With:
- Natural/Transparent: So the intrinsic beauty of the wood speaks for itself. A good sealer or varnish and you’re done!
- Stained: Changes or intensifies the wood’s color without hiding its beautiful grain. A stylish chameleon!
- Painted: Unleash your inner artist! Hides the grain for a uniform, modern look. Any color you imagine is possible.
- Distressed: A vintage or rustic touch? With sanding and scraping techniques, you can make your wall look like it came from another era.
3. The Rhythm of Your Wall: Installation Pattern
The pattern you choose is like the choreography of your wall. It can totally change how you perceive the space.
- Horizontal: If you want your living room to feel spacious, wider, and more relaxed. An infallible classic!
- Vertical: To trick the eye and make the ceiling appear higher. Perfect for spaces with low ceilings!
- Herringbone: A sophisticated pattern, a true “look at me.” Requires patience and precision, but the result… is spectacular!
- Chevron: Similar to herringbone, but with a continuous zigzag and more defined points. It will also demand extra care.
- Geometric/Mosaic: Here, creativity knows no limits! Play with wood pieces of different sizes or angles for a modern and artistic design.
- Board and Batten: Wide panels with thin, overlapping strips. An architectural look that adds texture and depth.
4. Calculator Moment: Ensuring You Don’t Run Short (or Have Too Much!)
- Measure Your Canvas: Width by height, at several points, for the total surface area.
- Calculate the Wood: The golden rule! Add an extra 10-15% to your calculations. It’s your lifeline for errors, imperfect cuts, or simply to have some spare.
- Think About Your Design: If your pattern is complex (angles, small pieces), waste will be greater. It’s better to have a little extra than to rush to the store mid-project.
- Adhesive and Nails: Check manufacturers’ recommendations and estimate what you’ll need.
5. Your Budget Speaks: How Much Are We Willing to Invest in This Dream?
Define a realistic budget. Think about the wood, tools (if you need to buy or rent), adhesives, nails, finishes, sandpaper… Be honest with yourself and your wallet to avoid surprises. Reclaimed wood can be a more expensive indulgence, while MDF and plywood are more budget-friendly options.

Chapter 2: Your DIY Hero’s Arsenal (Tools and Materials)
Having the right tools is like having superpowers for this project. It will make everything easier, safer, and the result, much more professional!
1. Your Essential Tools:
- Tape Measure and Pencil: The basics of any good builder!
- Level (Bubble or Laser): Your best friend! Absolutely CRUCIAL for ensuring every board is straight and your wall doesn’t look like a ship at sea. A laser level is a marvel if you can get one.
- Stud Finder: Your hidden treasure detector (for wood or metal studs behind the wall), where you’ll nail for super secure fastening.
- Saw (Miter, Circular, or Jigsaw):
- Miter Saw: The queen of straight and precise cuts, and perfect for those herringbone or chevron angles!
- Circular Saw: Versatile for long, straight cuts.
- Jigsaw: Indispensable for cutting those odd shapes around outlets and switches.
- Nail Gun (Brad Nailer or Finish Nailer) and Compressor: A godsend for your arms and your time! Speeds up the process and leaves strong, almost invisible fastening.
- Hammer and Finish Nails: The “old-fashioned” alternative if you don’t have a nail gun, but requires more patience and skill.
- Construction Adhesive (Wood Glue or Construction Adhesive): That secret glue that gives extra strength and prevents the wood from moving.
- Orbital Sander and Sandpaper: To leave edges smooth as silk and prepare the surface for an impeccable finish.
- Safety Gear: DO NOT forget it! Gloves, safety glasses, hearing protection, and a dust mask are ESSENTIAL. Your physical integrity is worth it.
- Caulk Gun and Utility Knife: To apply sealant and leave edges perfect.
- Putty Knife: To fill those small holes.
- Paint Brushes/Rollers: If you’re going to stain or paint, of course.
2. The Shopping List for Your Dream Wall:
- Selected Wood: The calculated amount, plus that 10-15% extra!
- Nails: The right type for your tool and long enough to grip well.
- Wood Filler: To make those small nail holes disappear.
- Paintable Acrylic Caulk: The “makeup” for any small gap between your wall and the ceiling or adjacent walls.
- Primer: If you’re going to paint the wood, this is key for a uniform and durable finish.
- Paint, Stain, or Sealer: The final dressing for your wood.
- Cleaning Supplies: To leave everything spotless at the end.
Chapter 3: Getting Ready (Preparing the Canvas)
Before the magic begins, we need a good stage. A well-prepared base is the secret to an impeccable and long-lasting finish.
1. Getting Started! Clear and Protect the Area
- Empty the Zone: Remove furniture and decor. Like you’re moving out, but just for a little while!
- Protect Your Floor: Cover the floor with tarps or plastic sheets. We don’t want dust, sawdust, or paint drops on your floor.
- ATTENTION! Electricity Off: Before touching switches and outlets, go to the main panel and turn off the electricity. Remove the covers and, if you feel comfortable, even the mechanisms to work better. Safety first, always!
2. Stripping the Wall: Goodbye Old Elements
- Molding and Baseboards: If the wooden wall is going to cover them, remove them carefully. If not, decide whether to keep them or integrate them.
- Hanging Objects: Take down pictures, shelves… Everything out!
3. Thorough Cleaning: The Secret to Good Adhesion
- Clean the Wall: Vacuum and thoroughly clean to remove dust, grease, and dirt. A clean wall is like giving a blank canvas to a painter.
- Quick Repairs: Fill large holes or cracks with spackle and sand. Small imperfections will be covered, but a very uneven wall can cause problems.
4. Finding Your Wall’s Bones! (Locating Studs)
- Your Stud Finder: Slide it across the wall to find the “bones” (vertical wood or metal studs) behind the drywall. This is where you’ll nail for maximum hold.
- Mark with Care: Draw a light vertical line down the center of each stud. Mark them well, as dust can play tricks.
5. The Secret to a Pro Finish: The Perfect (or Near-Perfect) Base
- Painting the Background (Expert Tip!): If your design will have small gaps between boards (like shiplap with spacing), paint the background wall a color similar to the wood or a dark one. This way, those gaps will go unnoticed. It’s magic!
- Level if Necessary: If your wall is a rollercoaster, consider adding a thin layer of plywood or MDF to create a perfectly flat surface.
Chapter 4: Preparing Your Pieces of Art (Cutting and Pre-Finishing)
Doing these tasks before installation is like cooking with ingredients already chopped: it saves you time and guarantees a chef-like result.
1. Give the Wood Time to Relax! (Acclimatization)
- Storage: Leave the wood in the room where you’ll install it for at least 48-72 hours before starting. It’s like the wood adapting to the environment, reducing expansion or contraction too much after installation.
2. Measure Twice, Cut Once: The Mantra of a Smart DIYer
- Initial Cuts: If you have a repetitive pattern, cut several pieces to the same length beforehand.
- Adjustment Cuts: For ends and around obstacles, measure and cut each piece individually. Precision is key!
- The Perfect Saw: Your miter saw will be your best friend for those clean and accurate cuts.
3. Smoothing the Way: Goodbye Splinters, Hello Smoothness (Sanding)
- Smooth Edges: Lightly sand the cut edges to remove splinters.
- Surface Preparation: If you’re going to stain or paint, sand the entire surface with medium-grit, then fine-grit sandpaper. This ensures the wood absorbs the finish evenly.
4. The Great Trick: Painting Before Nailing (It Will Save You Headaches!)
- Apply Finish Before Installing: Do it! There are several reasons:
- Uniform Coverage: You ensure that every corner, even those barely visible at the joints, is perfectly covered.
- Less Mess: Goodbye to taping everything and splashes on furniture!
- Efficiency: It’s much easier to paint flat boards on sawhorses.
- Let it Dry! Allow the wood to dry completely according to the manufacturer’s instructions before installing. Patience is a virtue here.
Chapter 5: The Magic Happens (Step-by-Step Installation)
Now, let’s get to work! Here, we’ll cover a general method that you can adapt to most patterns. Let’s imagine horizontal boards to make it easier to follow.
1. The Grand Launch: That First Board is the Foundation of Everything
- The Critical Point: The first board is the most important. If it’s not perfectly level, the entire wall will be crooked!
- Where to Start?
- From the Bottom: This is the most common. Any small error on the top board can be disguised with ceiling molding. Use your level to draw a straight line where the top edge of your first board will go.
- From the Top (or Center): If the top part is the most visible, or if you want the end boards to have the same width. This requires a bit more planning.
2. The Secret Glue: Applying the Adhesive
- “S” Pattern: Apply a wavy bead of construction adhesive on the back of the first board. Don’t use too much; we don’t want it to overflow!
3. Time to Nail! The First Board in Place
- Positioning: Align that first board with your leveled line very carefully. Press firmly against the wall for the adhesive to do its magic.
- Secure Nailing: With your nail gun, nail the board to the studs you marked. Two nails per stud, one top and one bottom. If it’s shiplap, nail into the top “lip” so the nails are hidden.
4. Rhythm and Consistency: Continuing the Installation
- One by One: Continue installing the boards, ensuring each one is level before nailing. Your level is your best friend, remember that!
- Spacers (If You Have Gaps): If your design involves separation between boards, use spacers (small pieces of wood of the same thickness, or even coins) so everything is perfect.
- End-of-Row Cuts: When you reach the end of each row, measure, cut, and fit.
- Staggered Joints: For a professional look, stagger the board joints in each row. This way, not all vertical joints are in the same line, creating a nicer and stronger pattern.
5. The Outlet Challenge: Don’t Panic, We Have a Plan!
- Measure Precisely: This is one of the most challenging parts!
- Turn off the electricity! (again).
- Measure Distances: From the previous board to the outlet, and the sides.
- Transfer to the Board: Draw the outline of the cut on the board you are going to install.
- Cut with Skill: Use your jigsaw. Drill a pilot hole to insert the blade.
- Test and Adjust: It’s better for the cut to be a tad larger than the outlet (the cover will hide it) than too small.
- Extension Boxes: If the wood is thick, outlets might sink too deep. You can buy “extension boxes” to make them flush with your new wall.
6. Bordering Beauty: Windows and Doors, No Problem!
- Detailed Measurements: Measure window and door frames.
- Clean Cuts: Use your saw to make straight cuts so the wood fits perfectly.
- The Frame of Beauty: Decide if the wood will stop just before the frame or overlap it. Then you can add moldings for a clean finish.
Chapter 6: The Icing on the Cake (Professional Finishing Touches)
Once all the wood is in place, the final steps are what make the difference between a good job and a work of art.
1. Goodbye Little Holes: Nail Filling
- Wood Filler: With a small putty knife or even your finger, fill all nail holes. Choose a color that matches the final finish.
- Remove Excess: Do it immediately so it doesn’t dry and become harder to remove.
2. One Last Gentle Review: Final Sanding
- Smooth Sanding: Once the filler is dry, lightly sand with fine-grit paper (220) until smooth and flush.
- General Sanding (Optional): If you didn’t pre-finish the wood, you can lightly sand the entire wall to get it ready for the final stain or paint. And then, clean up the dust!
3. The Final Dress: Stain, Paint, or Sealer (If Not Pre-finished)
- Staining: Apply the stain evenly. Wipe off excess according to instructions to avoid a sticky finish. Apply thin coats and let dry between them.
- Painting: If you didn’t do it before, apply a coat of primer. Then, your paint in thin, even coats. Let dry thoroughly.
- Sealing/Varnishing: If you’re looking for a natural or stained finish, a clear sealer will protect the wood and enhance its beauty.
4. The Makeup of Perfection: Caulking and Sealing
- Visible Joints: Use paintable acrylic caulk to fill any small gaps between the wooden wall and the ceiling, adjacent walls, or frames. This creates a super clean and finished look.
- Easy Application: A thin, even bead with the gun, then smooth with a wet finger or tool.
- Paint the Caulk: If necessary, paint it to blend with the color of the wood or wall.
5. Clean, Reinstall, and Admire! The Grand Finale
- General Cleaning: Vacuum and thoroughly clean to remove all traces of dust.
- Reinstallation of Accessories: With the electricity still off, reinstall the mechanisms of outlets and switches. Put the covers back on!
- Return Moldings: If you removed baseboards and moldings and didn’t replace them with wood, reinstall them now.
- Bring Back the Furniture! Once the wall is completely dry and accessories are reinstalled, return your furniture and decor. Turn on the light and behold your masterpiece!
Chapter 7: May Your Masterpiece Last (Maintenance and Care)
Now that you have your beautiful wooden wall, you’ll want it to stay that way for years. Your new wall deserves the best care, like a jewel!
- Regular Cleaning: Dust the wall with a soft, dry cloth.
- Deep Cleaning: For stains, a cloth lightly dampened with water and a mild wood cleaner (if the finish allows). Always test in an inconspicuous area first!
- Beware of Humidity! Protect the wood from spills. Clean them immediately.
- Control the Environment: In very dry areas, a humidifier can help prevent the wood from drying out; in humid areas, a dehumidifier will prevent swelling.
- Re-finishing (Long-Term): Over time, you may need to re-stain, paint, or seal to maintain its appearance. It’s like a “spa day” for your wall.
Chapter 8: Small Stumbles, Big Solutions (Troubleshooting)
Don’t worry if something isn’t perfect the first time! Here are quick solutions for common problems:
- Warped Boards: If you notice it early, sometimes you can loosen the nails, adjust, and re-nail. If it’s already dry, you can use wood filler or caulk to disguise it.
- Visible Gaps: Small gaps are friends of wood filler or caulk. Make sure the color is correct.
- Splinters or Damage: Lightly sand, apply wood filler, and touch up with the same finish.
- Nail Pops: If a nail protrudes, sink it back in with a hammer and fill the hole with wood filler.
The Finishing Touch: The Satisfaction of a Project Made with Heart
Building a decorative wooden wall in your living room is much more than a DIY project; it’s a rewarding adventure that can completely transform the feel of your home. Yes, it requires patience, precision, and attention to small details, but the final result is a personalized and beautiful addition that represents you!
Not only will you improve the aesthetics of your space, but you’ll also experience that indescribable satisfaction of having created something durable and meaningful with your own hands. Enjoy the process, learn along the way, and above all, celebrate your new, spectacular wooden accent wall! It’s your masterpiece!